Category Archives: Art

Crochet Me: Episode 1 – Andy Rose


Hey guys, I wanna introduce you to yet another new series on my YouTube channel, and this one you can be a part of!  It’s called “Crochet Me” in it I crochet famous YouTubers one week then viewers the next! 

To be a part of “Crochet Me” just post a picture of yourself or someone you want me to crochet to @louiesloops on Instagram with the hashtag #crochetmelouie and I’ll choose one person every other week to crochet!


This week I made my friend and YouTuber Andy Rose. You can check out his channel here, and maybe I’ll be crocheting you next week!

How to Crochet: A Triforce

I used to (am) a big Nintendo fan.. I had it painted on my wall, every system, the works. Why do I mention that? Well because the new Nintendo system, the Wii U, just came out this week and because of my love for Nintendo I felt the need to come out with a new pattern.

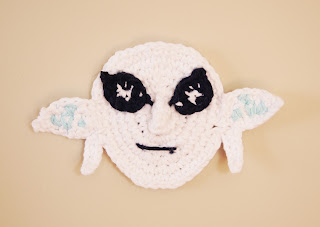
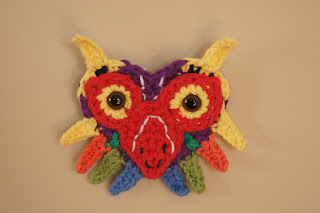
One of my favorite game series, like many others, is The Legend of Zelda, and obviously, one of the best of them is the Majora’s Mask. Check out my versions of the Deku, Zora, and Majora’s Masks available now in the Ravelry, Etsy, and Craftsy Store!! But that’s not it, check out the free pattern below of how to make a simple, yet effective triforce!


You can get the Deku, Zora, and Majora’s Mask patterns all for $5 on Ravelry or Etsy, or by simply clicking –>HERE<–

But what good is Link without a Triforce, right?

Here’s how to make tiny but simple triangles, which when put together make a perfect triforce, as seen here on an iPhone cover (available in my Etsy store here).

So here’s the quick and easy triangle pattern:

Materials:
(basically any 100% cotton works)
Needle to sew in ends with

Abbreviations:

-SL.ST = Slip Stitch
-SC = Single Crochet
-Ch = Chain

-Rnd = Round

Ch 4
Rnd 1: Skip first ch, Sc one in next 3, turn (3).
Rnd 2: Don’t ch, skip first st, sc on in next 2, turn (2).
Rnd 3: Don’t ch, skip first st, sc on in next, turn (1).
Here’s the tricky part…
Rnd 4: Sc one in each Rnd and st around the little triangle, and at the corners, sc 1, m.p. (ch 2, sl.st in first ch), sc 1. Continue this pattern around the triangle then, after your 3rd m.p, sl.st 1 into the first sc made in this Rnd.
Cut and pull through, leaving a long end to sew onto your project. Make three of these and put them together to form a simple, and tiny, triforce.

I know today’s Thanksgiving, and I need to apologize for not coming out with a new pattern related to that, but here’s a little gift. Tomorrow, as you may know, is Black Friday, and this Monday is Cyber Monday, you know… the days of the year where sales in store and online go out the ying yang. Check back tomorrow to get some coupons to go along side the awesome sales on my Etsy!

ANFSCD Ep. 1

So I thought it might be pretty neat to start posting something different then crocheting things up here every now and then, thus comes ANFSCD or “And Now for Something Completely Different” Episode 1!

So you may have seen these cool new art things people have been doing around the webs where they melt crayons on canvas to make it look like it’s raining. Well my girlfriend came up with a great idea where we could do the scene from My Neighbor Totoro (her favorite movie) where they’re standing at the bus stop. There’s one way to make these paintings in particular that I liked better then the “original” way which I found a tutorial here, but, I couldn’t get my hot glue gun working, so we just resulted to making it in a whole new, more fun, and more dangeous way! Wooo!!

This is our finished product.

So first I got the image of what we wanted painted on here, then I printed it out and started to cut out the parts we wanted to stencil out and paint on (with acrylic paints, not crayon)

Key note: cut the stencil out of painters tape and then paint it on! I had to do it twice because I’m dumb. Also, when your painting your design on, dab the paint on gently, or it will slide under the tape and make the edges less percise and more fuzzy.

After you have your design painted on, let it dry and then put tape over the design itself (I forgot to take photos, sorry :/). Also put little tabs up so the “rain” runs over the umbrella. This tutorial shows how to do this all wayyy better haha.

So, like I said earlier, I couldn’t get the glue gun working, so we did it the “old fashion” way. We just took a lighter and melted the crayons manually!

I have to say, I think it was a lot of fun doing it this way haha.

Finally peel off the tape reveling your finished product! Here’s ours!

I really like how it turned out, and I think it was an awesome first attempt! Look for lots more of these coming soon!!