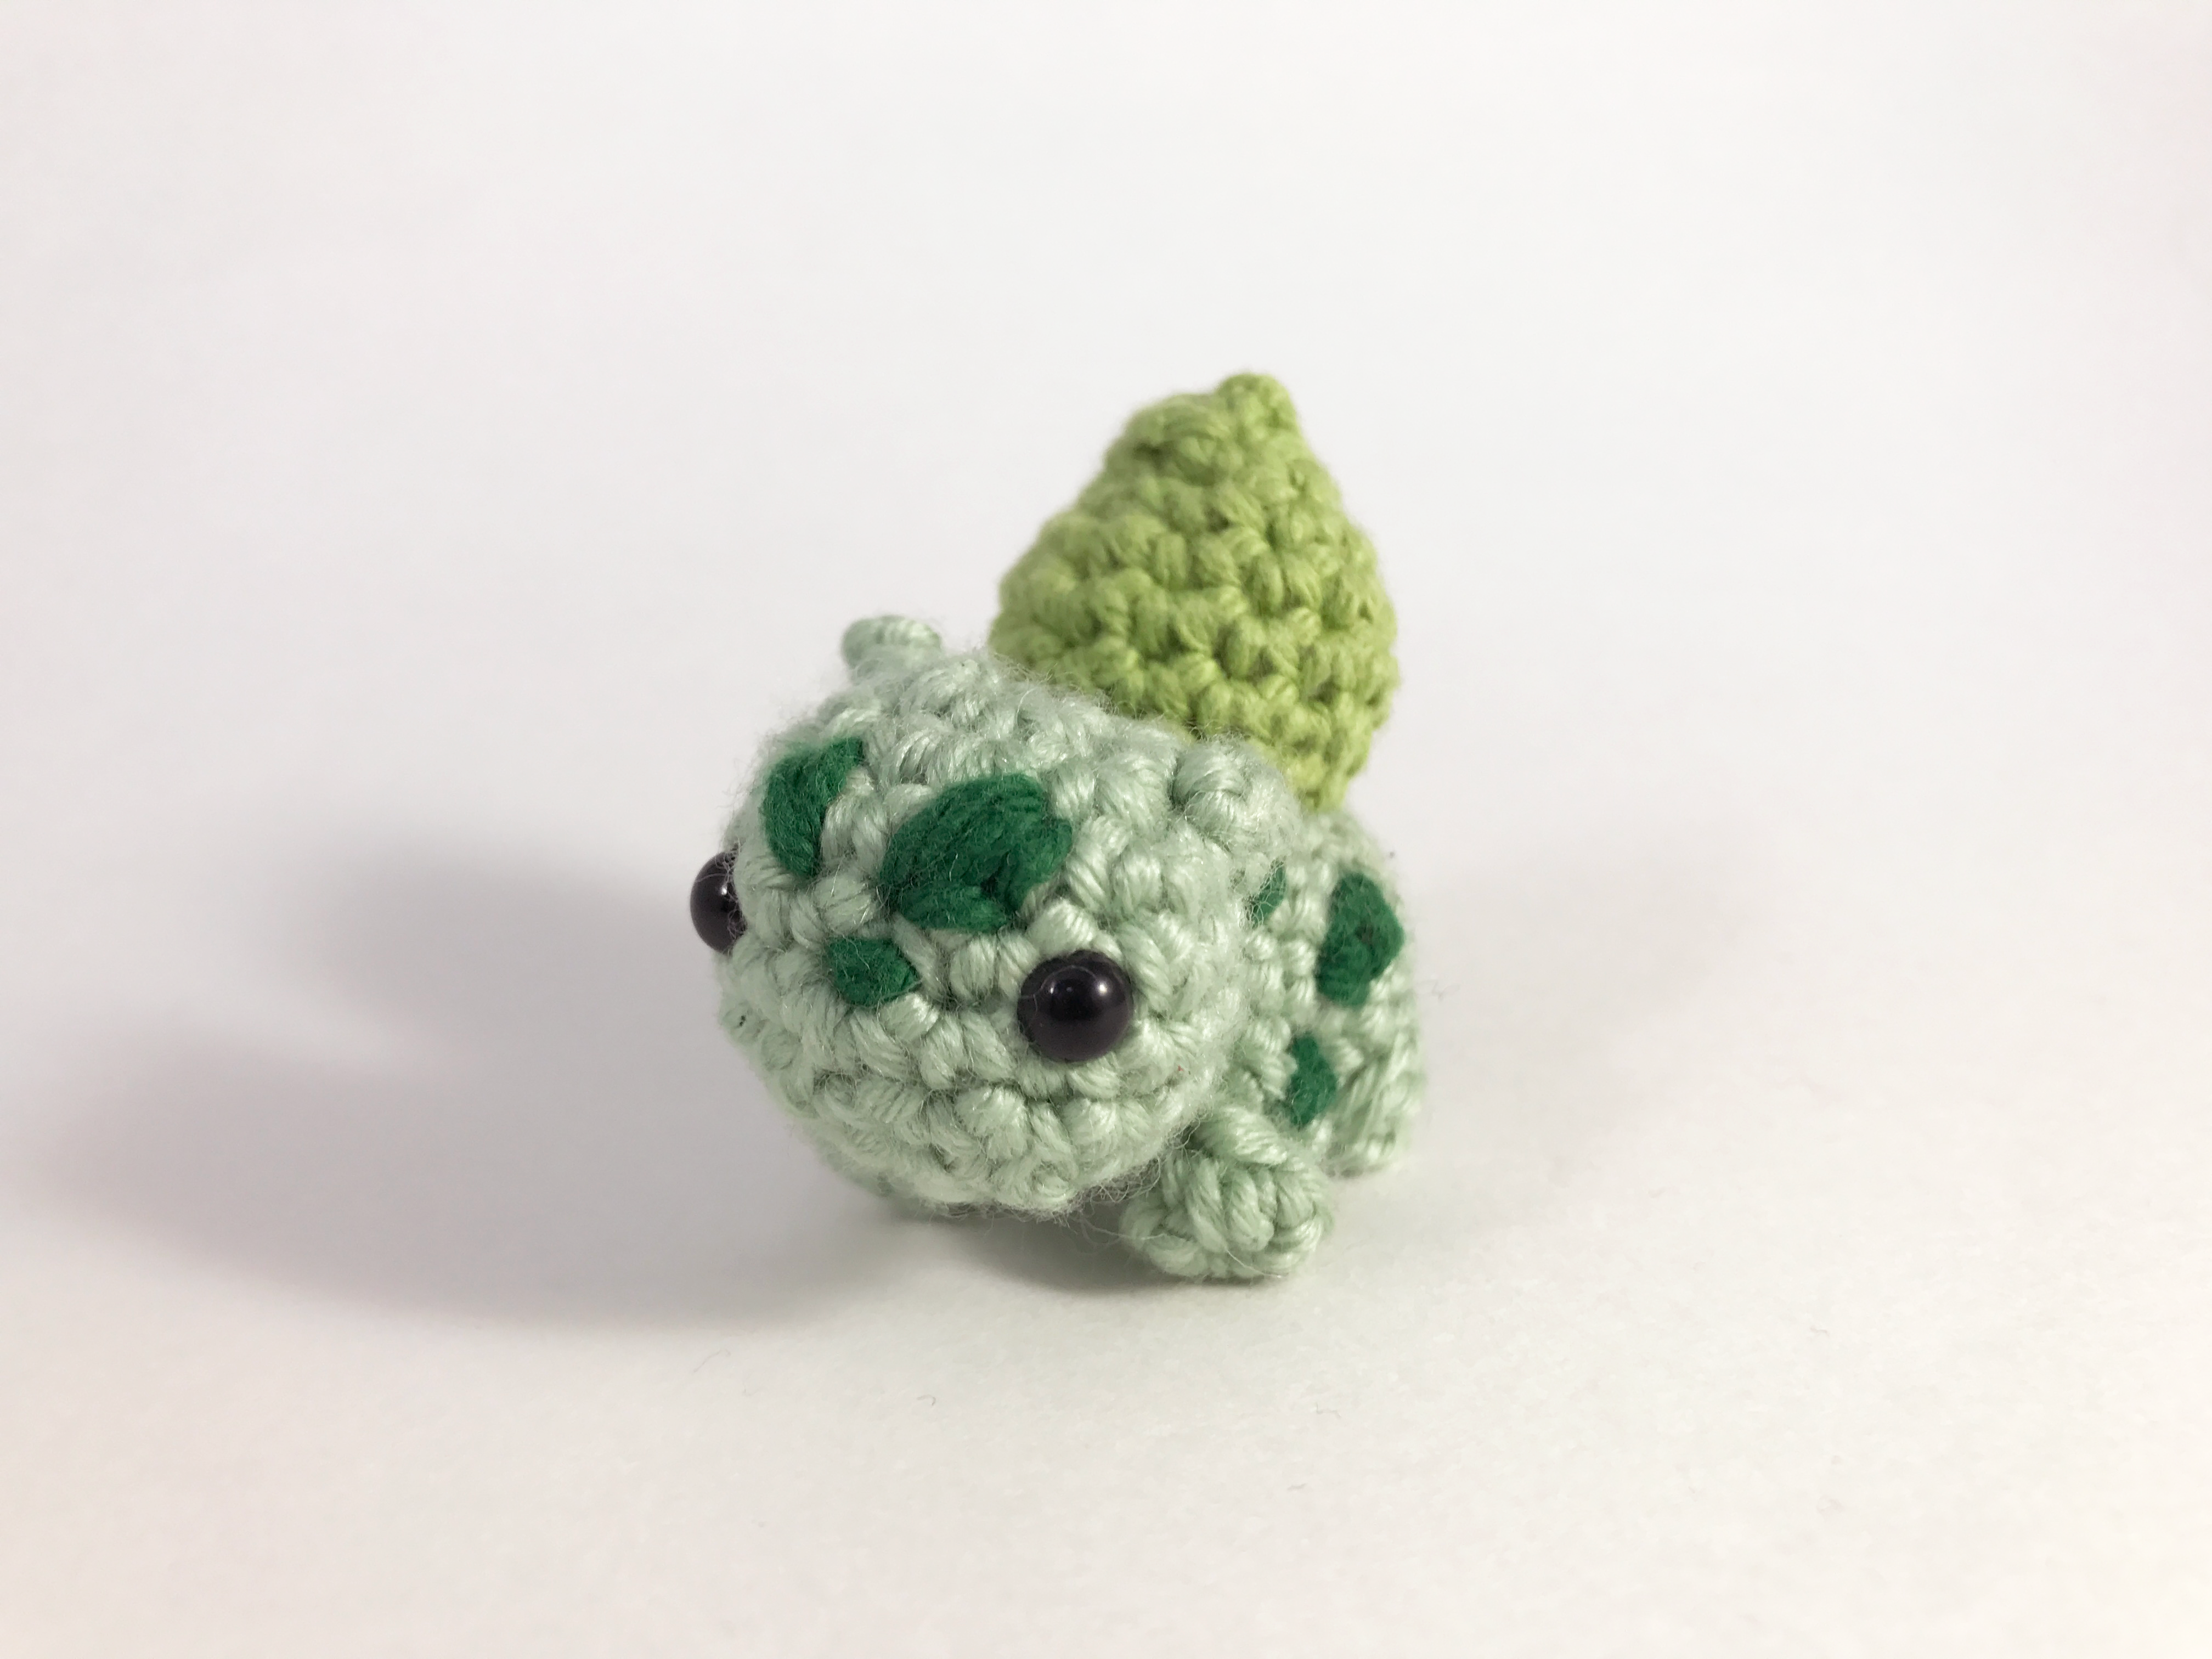
Category Archives: Nintendo

Super Mario Amigurumi


Pattern can be downloaded immediately after purchase

Have your own crocheted Mario sitting safe and sound on your dresser or hanging on your back pack! This little Mario from Super Mario Bros miniature amigurumi measures about 2 inches tall when finished and includes 5 unique video tutorials to help you get through the tough parts!

*Includes video tutorials for the more difficult parts of the pattern!*
*Teaches you how to make Luigi too!*

Materials needed:

– Worsted Weight yarn
– Size US-G/4.00mm
– Needle to sew in ends
– Scissors
– A small amount of stuffing
– Pipe cleaner

Stitches used:

– Sl.st (slip stitch)
– Sc (Single crochet)
– Dec (Decrease)
– Bo (Bobble stitch)

Difficulty: ● ● ● ○ ○


*Includes video tutorials!*

Bulbasaur Mini Amigurumi Pattern


Get 15% off by becoming a Patreon supporter!


Bummer, you missed it, but I made this guy during a live stream! I do them every week and if you’re watching live you get the pattern for free!

Tune in every week on Thursdays here at LouiesLoops.com!

How to make: ? Block


This month I’m dedicating entirely to the Mushroom kingdom! Why? Because why not!?You can learn how to make all the different miniature Mario villians and items with my new Crocheted Mini Mario Villains pattern bundle in my shop here:
https://www.etsy.com/shop/LouiesLoops?section_id=10439780 <

And check out the free video pattern for a mini ? Block below!!

_ _ _ _ _ _ _ _ _ _ _ _ _ _ _ _ _ _ _ _ _ _ _ _ _ _ _ _ _ _ _ _ _ _ _ _ _ _ _ _ _ _ _ _ _ _ _ _ _ _ _ _ _ _ _ _ _ _
Materials needed:
– Worsted Weight Yarn
– 7  Mesh Plastic Canvas
– Needle to sew in ends
Stitches used:
– None
Difficulty: ● ● ● ● ○
*Includes video tutorials!*


Part 1:
Time stamps in red are for video 1
 
Cut out 6 squares 5×5 out of the mesh plastic. (1:30 – 3:30 )
Cut the edges to make them smooth.
 
Using two strands of yellow yarn and a sharp needle sew the color fully onto the mesh plastic from corner to corner. (3:30 – 7:30 )

When it’s fully covered tie it together in the back and cut loose

 
Repeat this process for all 6 squares
 
For 4 out of the 6 squares:
Using a strand of white yarn sew on a ? on the face (1:30 – 12:00 )
 
 
Part 2:


(view diagrams above for extra help)

Using 2 long strands of yellow yarn and a sharp, long needle, begin sewing together 2 squares, 1 “?” and one blank. This “?” will act as our front and the blank will act as our top. (1 above)
Work down and connect another “?” which will act as our right side (2)
Work back across connecting another “blank” side, acting as our bottom (3)
Work back up, towards where we started connecting yet another “?” side, this will act as our left side (4)
Work towards the back connecting our left and top panels (5)
Work across to the right side connecting our final “?” panel, this will act as our back side (6)
Going back down, connect our back and right panels (7)
Across to the left, connect the bottom and back panels (8)
Working back up, connect the left and back panels together (9)
Pull the yarn and needle through and across, back to the beginning of where 9 started, be sure to work on the inside of the cube. Working back towards the front, sew together the bottom and left side of the piece (10)
Pull the yarn across to the right side and work together the right side and bottom panels, working towards the back panel (11)
Stuff slightly here by pinching the piece together (opening a side) and stuffing with a pencil.
Finally pull the yarn towards the top, through the cube itself (not the outside) and sew together the top and right panels (12)
Cut and hide both ends into the piece.


And don’t forget, you can learn how to make the whole lot of these characters, as well as how to make the shell into a Blue Shell with the new eBook in my shop here:

>> https://www.etsy.com/shop/LouiesLoops?section_id=10439780 <<

Subscribe on YouTube or follow me on Twitter, Instagram, or Facebook to get notified of new videos every week!

How to crochet: a Mario Shell

This month I’m dedicating entirely to the Mushroom kingdom! Why? Because why not!?You can learn how to make all the different miniature Mario villians and items with my new Crocheted Mini Mario Villains pattern bundle in my shop here:
https://www.etsy.com/shop/LouiesLoops?section_id=10439780

And check out the free video pattern for a mini Koopa shell below!!

Materials needed:
– Worsted Weight Yarn
– Size US-I/5.50 mm Crochet Hook
– Needle to sew in ends
Stitches used:
-St : Stitch or stitches
-Sl.st : Slip stitch
-Sc : Single Crochet
Difficulty: ● ● ● ○ ○
*Includes video tutorials!*

Gauge : 5 Rnds and 4 stitches per 1”
Finished piece is about 4” tall
Worked in the round


Pattern: 

Main (Starting in color: Red)
Ch 2
(1:35) Rnd 1: sc 6 in 2nd ch from the hook (6)
(2:00) Rnd 2: sc 2 (inc) in each st (12)
(3:10) Rnd 3: sc in each st around (12)
(4:00) Rnd 4: sc in next st, inc in next st, Repeat 6 times (18)
[4 red, 2 black, 7 red, 2 black, 3 red]
(6:30) Working in back loops for red sts, and both for black
Rnd 5: sc one in first, dec in next, Repeat 6 times (12)
(9:00) Rnd 6: Rnd 6: dec in each (6)
Cut, stuff and sew together

(12:45)

Bottom (In color: Sand)
Rnd 1: sc 6 in 2nd ch from the hook (6)
Rnd 2: sc 2 (inc) in each st (12)
Rnd 3: sc in next st, inc in next st, Repeat 6 times (18)
Cut, sew end in

Border (in color: white)
(15:25) Ch 19
Cut and pull through, leaving a long end

(16:30) Sew the border around the outside of the shell, through the back loops of the ch, front loops from Rnd 4 on the main, and back loops of the bottom.


And don’t forget, you can learn how to make the whole lot of these characters, as well as how to make the shell into a Blue Shell with the new eBook in my shop here:


https://www.etsy.com/shop/LouiesLoops?section_id=10439780

Subscribe on YouTube or follow me on Twitter, Instagram, or Facebook to get notified of new videos every week!

How to crochet: A Snitch or Fairy

Kay, last Zelda pattern for a bit…. I think….

If you’ve been missing, I’ve been on a bit of a kick as far as Zelda patterns go, to celebrate the new game coming out! Check out the patterns for a Big Deku Mask and Mini Deku Mask posted the past few weeks!!

Now today’s pattern is for a miniature Navi fairy from Zelda or a snitch from Harry Potter!!


Materials
-Lily Sugar ‘n Cream (Blue, Yellow, and White)
-Size US-G/4.00 mm Crochet Hook
-Needle to sew in ends
-Stuffing

Abbreviations
-Sc : Single Crochet
-Sl.st : Slip Stitch
-Dec/Inc : Decrease/Increase
-Hdc : Half-Double Crochet
-St : Stitch or stitches
Worked in the round

Pattern:

Big wings
Ch 7
(1:45) Rnd 1: starting in 2nd ch from the hook, sl.st, sc, hdc, hdc, sc, sc (6)
Cut and pull through leaving long enough end to sew onto body.
Small wings
Ch 3
(2:55) Rnd 1: starting in 2nd ch from the hook, sl.st, hdc (2)
Cut and pull through leaving long enough end to sew onto body, just under/behind the big wings.
Body
Ch 2
(4:00) Rnd 1: sc 6 in 2nd ch from the hook (6)
(4:50) Rnd 2: inc (sc 2) in each st (12)
(6:00) Rnd 3: sc in first 3 sts, inc in next, repeat 3 times (15)
(7:00) Rnd 4 – 6: sc in each st around (15)
(7:45) Rnd 7: sc in first 3 sts, dec in next, repeat 3 times (12)
Sew on wings here
(13:30) Rnd 8: dec in each st (6)

Cut, stuff and sew together

Check out another Zelda pattern, like the one for a mini Deku Mask here!

Subscribe on YouTube or follow me on Twitter, Instagram, or Facebook to get notified of new videos every week!

How to crochet: a Big Deku Mask

Majora’s Mask just came out on the 3DS last week so to celebrate I made a big deku mask that’s from the game!!

Last week I made a mini version of this same mask which you can check out right here: http://new.louiesloops.com/2015/02/how-to-crochet-a-mini-deku-mask/

Make your own with the free video pattern below!


Materials
-Lily Sugar ‘n Cream (Brown, Black, Green, and Yellow)
-Size US-G/4.00 mm Crochet Hook
-Needle to sew in ends
-Stuffing

Abbreviations
-Sc : Single Crochet
-Sl.st : Slip Stitch
-Dec/Inc : Decrease/Increase
-Hdc : Half-Double Crochet
-St : Stitch or stitches
Worked in the round

Pattern:

Body
Ch 2
Rnd 1: sc 6 in 2nd ch from hook, don’t turn. (6)
Rnd 2: sc 2 (inc) in each. (12)
Rnd 3: sc in first, inc in next, repeat 6 times. (18)
Rnd 4: sc in first 2, inc in next, repeat 6 times. (24)
Rnd 5: sc in first 3, inc in next, repeat 6 times. (30)
Rnd 6: sc in first 4, inc in next, repeat 6 times. (36)
Rnd 7: sc in first 5, inc in next, repeat 6 times. Sl.st in next. (42, and 1 sl.st)
Cut and pull through, sew in end.
(2:40) Mouth
Rnd 1: Pull loop through the very middle of the body, sl.st 16 in a circle. Pull a sizable amount of yarn through the center and cut off.
Rnd 2: sl.st in first, turn, sc 1 in each of the sl.st’s made, don’t turn. (16)
Rnd 3 and 4: sc in each st around (16)
Sl.st in next, cut and sew in the end.
Inside of mouth
Ch 2
Rnd 1: sc 6 in 2nd ch from hook, don’t turn. (6)
Rnd 2: sc 2 (inc) in each. (12)
Sl.st in next, cut and sew in the end.
(13:30) Eyes (Make 2)
In yellow, Ch 2
Rnd 1: sc 3 in 2nd ch from hook, turn. (3)
Rnd 2: ch 1, sc 2 in each. (6)
Cut and pull trough leaving a long enough end to sew onto the body of the mask
(16:00) Leaves (Make 3)
In green Ch 9
Rnd 1: sl.st in 2nd ch from hook, sc in next two, hdc in next 4, sc 3 in last, turn upside down. (10)
Rnd 2: on backside, hdc in next four, 
sc in next two, sl.st in last. (7)

Cut and pull through leaving enough to sew onto the top of the body

Check out last weeks pattern for the mini Deku Mask here!

Subscribe on YouTube or follow me on Twitter, Instagram, or Facebook to get notified of new videos every week!

How to crochet: a Mini Deku Mask

New Legend of Zelda game coming out on the 3DS?! WAIT ITS EVEN BETTER!!! Majora’s Mask!! WOOOO!!

So this Thursday the new Majora’s Mask 3DS game comes out and I’m super excited, so to show my appreciation, I decided to make a little Deku Mask from the game! It’s super tiny so you can sew it onto a bag or put it on a pin!

Alright, well check out the free video pattern below!

Materials
-Lily Sugar ‘n Cream (Brown, Black, Green, and Yellow)
-Size US-G/4.00 mm Crochet Hook
-Needle to sew in ends
-Stuffing

Abbreviations
-Sc : Single Crochet
-Sl.st : Slip Stitch
-Dec/Inc : Decrease/Increase
-St : Stitch or stitches
Worked in the round

Pattern:

Main (Video Part 1)
Ch 2
(1:30) Rnd 1: sc 6 into the 2nd ch from the hook (6) Don’t Turn
(2:20) Rnd 2: sc 2 (inc) in each st around (12) [4 brown, 2 black, 6 brown]
(4:40) Rnd 3: sc in next st, inc in next st, repeat 6 times (18)
Sl.st in the next, cut and pull through
Mouth
(7:50) Ch 6, stitch around black made in in the main part.
Leaves (Video Part 2)
Ch 5 (0:45)
(1:15) Rnd 1: sl.st into the 2nd ch from the hook, sc in next 2 chs, sl.st in last (4)
(1:50) Rnd 2: ch 4, sl.st into the 2nd ch from the hook, sc in next 2 chs, sl.st in first ch made. (4)
(2:40) Rnd 3: ch 4, sl.st into the 2nd ch from the hook, sc in next 2 chs, sl.st in first ch made. (4)
Cut and pull through

Sew on leaves, embroider on eyes in yellow.

Subscribe on YouTube or follow me on Twitter, Instagram, or Facebook to get notified next week when I make a big Deku Mask!

Luigi Catches a Ghost: New Yarnimation!

Hey guys!! I spent all last night making this little Halloween Yarnimation for you guys! I really hope you like it, because I love it haha.

You can get the pattern for the mini Luigi, and the rest of Mario and his friends in my Etsy shop here!!

Oh also I’m giving away a free Pokeball! To win just comment below or on the video who you think this Pokemon is!

How to crochet: Kirby!

Hey guys! This may be one of the biggest free patterns I’ve ever come out with, but I got a loooot of requests for it so I figured why not! So first off, I just came out with a pattern for how to make Mario, Luigi, Wario and Waluigi! You guys should check it out in the Etsy store!

Okay, well let’s get to business, here’s a couple videos for the pattern and the written version can be found below! Let me know what you think in the comments and please if you haven’t already,
subscribe on YouTube!


Materials:
(basically any 100% cotton works)
Needle to sew in ends with

Abbreviations:
-sc = Single Crochet
-inc = Increase (sc 2 in one st)
-dec = Decrease (sc 2 together)
-bo = Bobble stitch (how to here)
-ch = Chain
-st = Stitch
-Rnd = Round
In pink Ch 2
Rnd 1: sc 6 in the second ch from the hook. Don’t turn. (6)

Rnd 2: sc 2 (inc) in each st around. (12)

Rnd 3: sc in each st around (12)

Rnd 4: sc in next st, inc in next st, repeat 6 times (18)

Rnd 5: sc in each st around (18)

Rnd 6: bo (bobble stitch) in first, sc one in next 7 sts, bo in next, sc one in last 9 sts (18; 2 bo, 16 sc)

Rnd 7: sc in each st around (18)
Sew on eyes here (see video part 1 at ~10:45)

– Switch to video part 2 here –
Rnd 8: sc in first 2 sts, bo in next (in red), sc one in next 4 sts, bo in next (in red) sc in next 10 sts (18; 2 bo, 16 sc)
Sew on a mouth in red here

See video here for how to stuff and finish.
Rnd 9: sc in first st, dec in next, repeat 6 times (12)

Rnd 10: dec in each st around (6)

Done! Now don’t forget to keep your mini Kirby away from any food, he has a tendency to eat anything and everything around him and turn it into little weapons.