Category Archives: Pattern

How to Crochet: Heisenberg

So it’s been a while… I’d like to say a few things, but there’s no time, pattern time!!!

Halloweens coming up again, and theres nobody I can think of scarier than Heisenberg himself. Those who don’t know who Walter White is should start watching Breaking Bad… now. No seriously, stop reading this and watch all 5 seasons of Breaking Bad in one sitting and then come back here. Shouldn’t take too long.

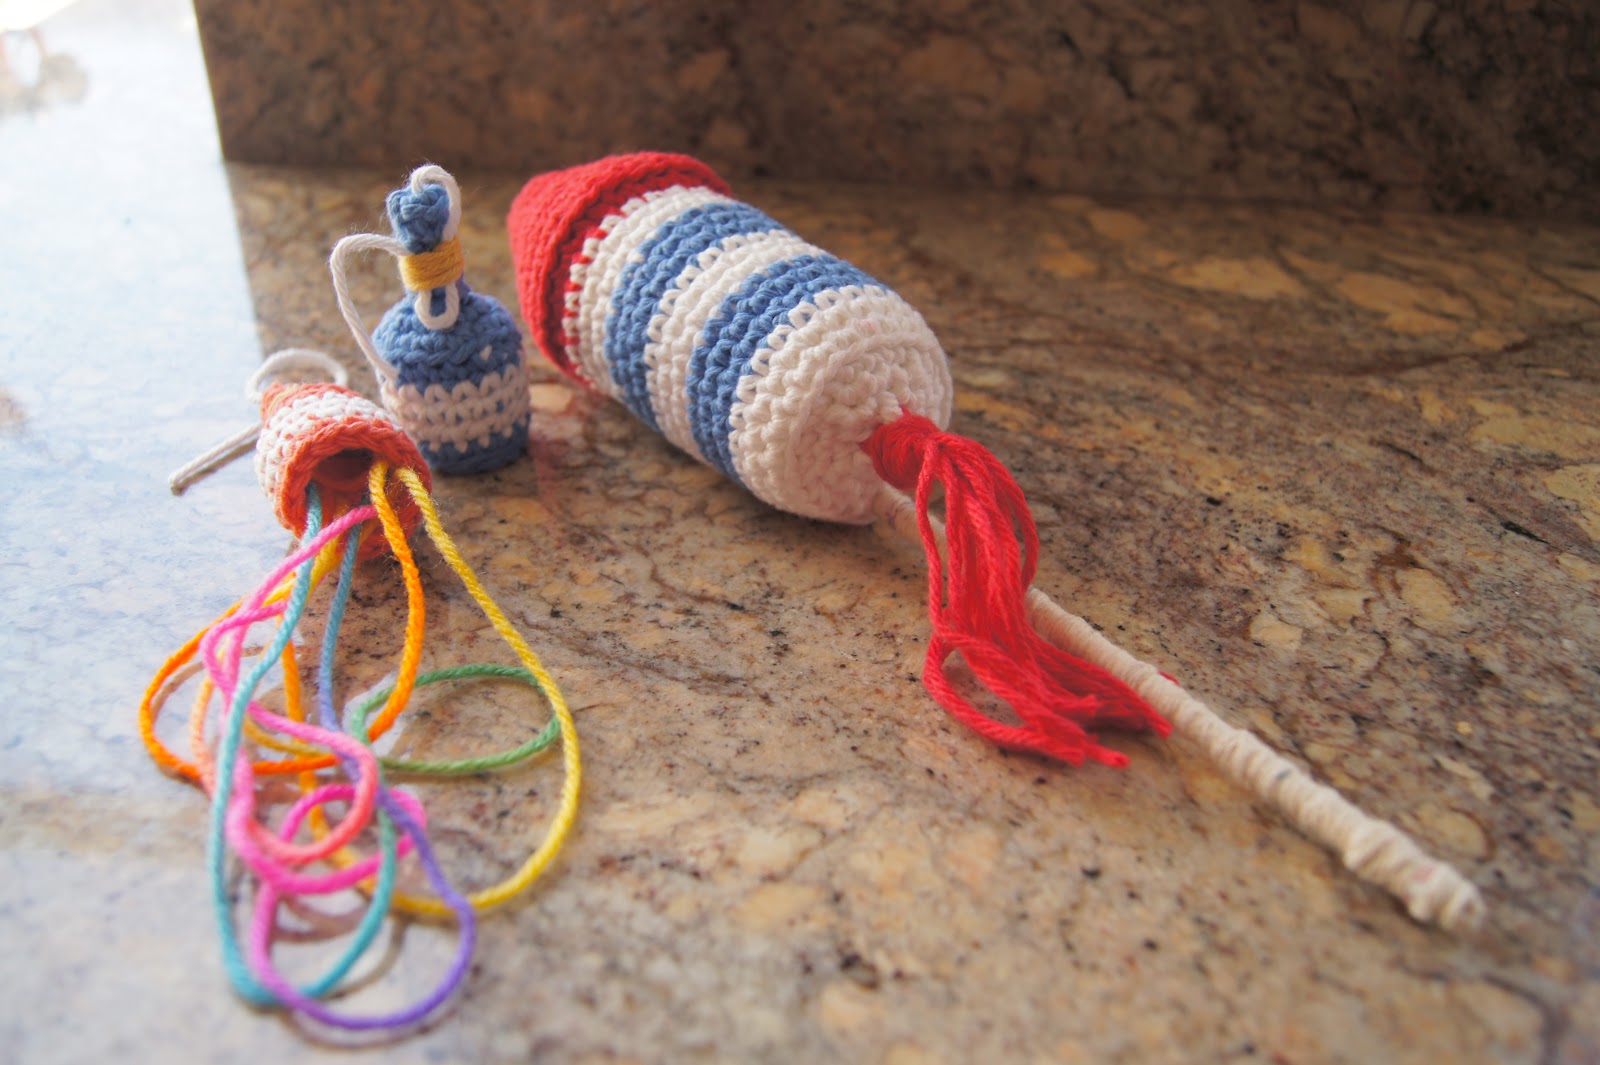
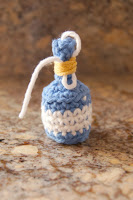
So while those guys are gone, check out this pattern I made for a recent Breaking Bad themed Reddit gift exchange!

And check back soon for a long awaited video tutorial for the Bat Pin pattern I posted a while back! Yep, video tutorials, coming soon to a Louie’s Loops near you!!

Finally, you can buy this little dude in my shop HERE


Materials:
(basically any 100% cotton works)
Needle to sew in ends with
-Three nickels or small coins
Abbreviations:
-SL.ST = Slip Stitch
-SC = Single Crochet
-dec = decrease
-inc = increase
-Ch = Chain
-Rnd = Round

Body and Head:

Ch 2 or use adjustable ring (Don’t Turn)
Rnd 1: sc 6 in 2nd ch from the hook (6)
Rnd 2: sc 2 in each st (12)
Rnd 3: sc in next st, inc in next st, Repeat 6 times (18)
Rnd 4: sc one in each (18)
Rnd 5: sc in next 2 st, inc in next st, Repeat 6 times (24)
Rnd 6: sc in next 3 st, inc in next st, Repeat 6 times (30)
Rnd 7-12: sc one in each (30)
Rnd 13: sc in next 3 st, dec in next st, Repeat 6 times (24)
Rnd 14: sc one in each (24)
Rnd 15: sc in next 2 st, dec in next st, Repeat 6 times (18)
Stuff here
Rnd 16: sc in next st, dec in next st, Repeat 6 times (12)
Change to white
Rnd 17: sc one in each [3 white, 9 black] (12)
Rnd 18: sc one in each [1 black, 1 white, 10 black] (12)
Rnd 19-21: sc one in each (12)
Stuff here and put in 3 nickels. These will help keep the finish piece upright.
Rnd 22: sc dec one in each. (6)
Draw last 6 stitches up and close tightly.  Weave in end.

Hat:
Ch 2 or use adjustable ring (Don’t Turn)

Rnd 1: sc 6 in 2nd ch from the hook (6)
Rnd 2: sc 2 in each st (12)
Rnd 3: sc in next st, inc in next st, Repeat 6 times (18)
Rnd 4: sc in next 2 st, inc in next st, Repeat 6 times (24)
Rnd 5: sc in next 3 st, inc in next st, Repeat 6 times (30)
Rnd 6: Working in back loops only, sc one in each (30) This will make the ridge for the top of the hat
Rnd 7-9: sc one in each st (30)
Rnd 10: sc one in first 15 sts, two in next, repeat once (32)
Rnd 11: sc one in each st (32)
Rnd 12: Working in front loops only, sc one in first 4 sts, inc in next, one in next 4, inc in next, one in next 10, inc in next, one in next 4, inc in next, and finally one in last 6 sts (36)
Rnd 13: sc one in next 5 sts, inc in next st, Repeat 6 times (42)
Cut and weave in end.
Bag of baby blue:
Ch 5
Rnd 1: skip first ch, sc one in next 3 chs, sc two in next ch, turn work upside-down and sc one in the 3 last chs so that your working back but never turning, sc two in the last ch (but first ch made). Don’t turn. (8)
Rnd 2: Working in back loops only, sc one in each st around (8)
Rnd 3: sc one in each st (8)
Change to white
Rnd 4: Here you’re going to be sc the piece together. In both the first and last sts together sc one, continue down the piece a total of 4 times. (4)
Cut and weave in the end.
For the goatee, I cut out a small amount of felt and sewed it onto the face along with some simple eyes. I’d suggest using buttons for eyes instead of the way I did it, but it’s all preference.
For the glasses I cut out two identical pieces of felt and sewed them together. I tried to make some crocheted glasses instead, but it never really looked right.
And that’s that! Now you can have the scariest and most dangerous drug dealer of all time sitting cutely on your counter!

How to Crochet: A Triforce

I used to (am) a big Nintendo fan.. I had it painted on my wall, every system, the works. Why do I mention that? Well because the new Nintendo system, the Wii U, just came out this week and because of my love for Nintendo I felt the need to come out with a new pattern.

One of my favorite game series, like many others, is The Legend of Zelda, and obviously, one of the best of them is the Majora’s Mask. Check out my versions of the Deku, Zora, and Majora’s Masks available now in the Ravelry, Etsy, and Craftsy Store!! But that’s not it, check out the free pattern below of how to make a simple, yet effective triforce!


You can get the Deku, Zora, and Majora’s Mask patterns all for $5 on Ravelry or Etsy, or by simply clicking –>HERE<–

But what good is Link without a Triforce, right?

Here’s how to make tiny but simple triangles, which when put together make a perfect triforce, as seen here on an iPhone cover (available in my Etsy store here).

So here’s the quick and easy triangle pattern:

Materials:
(basically any 100% cotton works)
Needle to sew in ends with

Abbreviations:

-SL.ST = Slip Stitch
-SC = Single Crochet
-Ch = Chain

-Rnd = Round

Ch 4
Rnd 1: Skip first ch, Sc one in next 3, turn (3).
Rnd 2: Don’t ch, skip first st, sc on in next 2, turn (2).
Rnd 3: Don’t ch, skip first st, sc on in next, turn (1).
Here’s the tricky part…
Rnd 4: Sc one in each Rnd and st around the little triangle, and at the corners, sc 1, m.p. (ch 2, sl.st in first ch), sc 1. Continue this pattern around the triangle then, after your 3rd m.p, sl.st 1 into the first sc made in this Rnd.
Cut and pull through, leaving a long end to sew onto your project. Make three of these and put them together to form a simple, and tiny, triforce.

I know today’s Thanksgiving, and I need to apologize for not coming out with a new pattern related to that, but here’s a little gift. Tomorrow, as you may know, is Black Friday, and this Monday is Cyber Monday, you know… the days of the year where sales in store and online go out the ying yang. Check back tomorrow to get some coupons to go along side the awesome sales on my Etsy!

How to crochet an Oval

This pattern is looong over due, but thanks to Kelly, a follower who commented earlier this week, I got my butt in line and decided to finally put it up.

It’s really not that detailed, but I couldn’t find many good patterns for a legitimate oval when I was making my Batman hat, so I made one up. Other than the Batman hat, I used these ovals to make a couple really quick and simple coasters inspired by probably my favorite video game Portal.

So here’s a pattern for a simple oval and instructions on how to make it for a Batman logo and for some Portal coasters:

Crocheted Oval Pattern
Materials:
(basically any 100% cotton works)
Needle to sew in ends with
Abbreviations:
-st = Stitch
-sc = Single Crochet
-Ch = Chain

-Rnd = Round

Ch 2
Rnd 1: sc 6 in 2nd ch from hook, don’t turn. (6)
Rnd 2: sc 3 in first st, 2 in next, 1 in next, repeat once. (12)
Rnd 3: sc 1 in first st, 2 in next three, 1 in next 3, 2 in next three, 1 in last two sts. (18)
Rnd 4: sc 1 in first two sts, 2 in next (inc), 1, 2, 1, 2, 1 in next four, 2 in next, 1, 2, 1, 2, 1 in last two sts. (24)
Rnd 5: sc 1 in first three sts, 2 in next, 1, 2, 1, 2, 1 in next seven, 2 in next, 1, 2, 1, 2, 1 in last four sts. (30)
Depending on how large you made the bat, you may need to keep going or stop sooner, here’s a few more Rnds
Rnd 6: sc 1 in first four sts, 2 in next, 1, 2, 1, 2, 1 in next ten, 2 in next, 1, 2, 1, 2, 1 in last six. (36)
Rnd 7: sc 1 in first five sts, 2 in next, 1, 2, 1, 2, 1 in next thirteen, 2 in next, 1, 2, 1, 2, 1 in last eight. (42)

*When the oval is big enough to fit the bat onto, sl.st in the next st, cut, pull through and sew into the project to hide it, or leave a long end to sew onto the hat.*
For Portal coasters change to either blue or orange here:
Rnd 8: sc 1 in first six sts, 2 in next, 1, 2, 1, 2, 1 in next sixteen, 2 in next, 1, 2, 1, 2, 1 in last ten.

If you haven’t figured it out, here is the pattern for making it larger and larger, although at some point I don’t think this will work: increase the scs in the begining by one each Rnd, then continue the pattern, 2, 1, 2, 1, 2 in the next five sts, then sc 1 in 3 more sts then the last Rnd (ex: ten for Rnd 6, thirteen for Rnd 7). Do the 2, 1, 2, 1, 2 pattern again in the next five, then finally sc 1 in 2 more sts then the last Rnd (ex: 2 in Rnd 4 and 4 in Rnd 5)

Lion Patterns!

As I promised yesterday, check out the ferocious new pattern by Lucy (Blog / Etsy), here it is, Boris the Lion!

Boris The Tiny Lion
Amigurumi Pattern


Abbreviations:
ch = chain
st = stitch or stitches
sc = single crochet (US), double crochet (UK)
dc = double crochet (US), treble crochet (UK)
hdc = half double crochet (US), half treble crochet (UK)
BLO = back loop only
FLO = front loop only
tog = together
sc2tog = decrease by working two sc together
FO = fasten off

General instructions:
Work in rounds unless otherwise stated and do not join rounds unless told to. Use a stitch marker to mark the start of a round – a small piece of different coloured yarn placed under the stitch at the start of the round will do. To start a round, you can use the magic ring method, but I prefer (ch2, work 6 sc into 1st ch). If you work the 6 sc over the tail of yarn as well you can use that to pull the hole tight.

Work through both loops of stitches unless otherwise indicated.

You will need:
Small amount of yellow/gold yarn.
Small amount of brown yarn.
Small amount of black yarn.
Small amount of stuffing.
3.5mm (E) hook.

Special stitch instructions:
5 dc pop: popcorn stitch for legs. Work 5 dc into 1 st, take hook out leaving loop, put hook through 1st dc & pull loop through.

3 dc bob: bobble stitch for mane. YOH, insert hook into next stitch, YOH and pull through stitch, YOH, pull through 2 loops, *YOH, insert hook into same stitch, YOH and pull through stitch, YOH, pull through 2 loops, repeat from*, YOH, pull through all 4 loops on hook.


Body:
Start using yellow/gold yarn.
Round 1: Ch 2, work 6 sc into 1st ch – 6 st.
Round 2: [2 sc in next st, sc in next st] 3 times – 9 st.
Round 3: Sc in each st around – 9 st.
Round 4: [2 sc in next st, sc in next 2 st] 3 times – 12 st.
Round 5: [2 sc in next st, sc in next st] 6 times – 18 st.
Round 6: Sc in each st around – 18 st.
Change to brown yarn.
Round 7: [Sc in next st, 3 dc bob in next st] 9 times – 18 st.
(Push the bobbles outwards after each round.)
Round 8: Sc in next st, [sc in next st, 3 dc bob in next st] 8 times, sc in next st – 18 st. (Optional: to make ears do the 2nd and 5th bobbles in the yellow/gold yarn).
Round 9: [Sc in next st, 3 dc bob in next st] 9 times – 18 st.
Change to yellow/gold yarn.
Round 10: [2 sc in next st] 2 times, sc in next 12 st, [2 sc in next st] 4 times – 24 st.
Round 11: 5 dc pop in next st, sc in next 19 st, 5 dc pop in next st, sc in next 3 st – 24 st.
Round 12: Sc2tog, sc in next 18 st, [sc2tog] 2 times – 21 st.
Round 13 – 15: (3 rounds) Sc in each st around – 21 st.

Stuff as far as you can and embroider face with black yarn. Use French knots to make eyes.

Round 16: Sc in next st, 5 dc pop in next st, sc in next 16 st, 5 dc pop in next st, sc in next 2 st – 21 st.
Round 17: Sc in each st around – 21 st.
Round 18: [Sc2tog, sc in next 5 st] 3 times – 18 st.
Round 19: [Sc2tog, sc in next st] 6 times – 12 st.
Round 20: [Sc2tog] 6 times – 6 st.
FO, leaving length of yarn. Finish stuffing and sew up hole at end.

Tail:
Ch 5, turn, miss ch next to hook, ss in next 4 ch.
FO and sew to bottom. Sew or knot a little bit of brown yarn to the end to make a tuft.

Don’t forget to check out my free pattern of Leroy the Lion pin on her blog here!

Fun With Stitches: Split Single Crochet Stitch

Hey guys! Sorry for the hiatus! I just moved to San Francisco for school, and it’s been a bit busy for me. So this is my first time away from home and there are a few things that I never thought about getting haha. One of which is a hot pad for pots and pans, but you know I’m not going to go buy them!

So I knew I wanted to make a hot pad, but didn’t know what stitch or pattern to use. I follow a site called New Stitch a Day, it’s this really awesome site where they post new “how to’s” for crochet and knitting each day! Every day Johnny posts a stitch with a beautifully made video that boggles my mind and makes me want to use it in my projects, so I did!

I used a stitch called the Split Single Crochet Stitch, here is a video from New Stitch a Day on how to do it:

Here’s what the stitch looks like close up.

———————————————————————————————————————-
Materials:
Lion Brand Cotton/Lily Sugar’n Cream

(basically any 100% cotton works)
Needle to sew in ends with
Abbreviations:
-SL.ST = Slip Stitch
-SC = Single Crochet
-HDC = Half Double Crochet
-Ch = Chain

-Rnd = Round

Ch 30
Rnd 1:  skip first ch, sc 1 in each ch (29)
Rnd 2 – 40: ch 1, using the Split Single Crochet Stitch (how to video above), sc 1 in each (29)
*For edging*
Rnd 41: On the edge of the pad (the sides of Rnds 1-40), hdc 1 in first, sl.st in next, repeat until you reach end (40 [20 hdc, 20 sl.st])
Rnd 42: Repeat the process (hdc 1, sl.st 1) down the chs made in the beginning (your basically just continuing this pattern in each Rnd and stitch around your pad) (≈30)
*For hanging loop*
At the end of Rnd 42, ch 8 and sl.st 1 in last st used
Rnd 43: Repeat process in Rnd 41
Rnd 44: Repeat process in Rnd 42, when you reach the end, cut, pull through and sew into your project to hide the end

Now you can safely rest pots and pans without worrying about burning your table!

P.S. Don’t really use crummy yarn for this, it could easily melt if you use a low grade acrylic or polyester yarn.

Fat-free and calorie-free cupcakes!

I know what you’re thinking… “Haven’t I seen this before on sweetsimplestuff.com?” The answer is totally yah, but some people haven’t yet so here it is yet again, a free pattern for some really quick and easy Crocheted Cupcake Coasters (I sure to love alliterations).

These cupcakes are for sale in my Etsy store here!

 Here are some photo’s:

Materials:
(basically any 100% cotton works)
Needle to sew in ends with

Abbreviations:
-SL.ST = Slip Stitch
-SC = Single Crochet
-HDC = Half Double Crochet
-DC = Double Crochet
-Ch = Chain
-Rnd = Round

In color A (brown) Ch 10
Rnd 1: Sc 8, turn.
Rnd 2: ch 1, sc 8 in back stitches
Rnd 3 – 14: Repeat x 12 (14 total)
Change to color B
Rnd 15: ch 1, Sc 1 in the sides of each row 14, turn. [Don’t cut, Leave color B attached] (14)
Change to color C
Rnd 16: ch 1, sc 2 in first, sc 1 in next 12, sc 2 in next, turn. (16)
Rnd 17: Don’t ch, skip first st, sc 1 in next 14, stop one early, turn. (14)
Rnd 18: ch 1, sc 1 in each, turn. (14)
Rnd 19: Don’t ch, skip first st, sc 1 in next 12, stop one early, turn. (12)
Rnd 20: ch 1, sc 1 in each, turn. (12)
Rnd 21: Repeat (12)
Rnd 22: Don’t ch, skip first st, sc 1 in each, turn. (11)
Rnd 23: Repeat (10)
Rnd 24: Repeat, cut and tie off. (9)
*For Cherry, count in three stitches from top, pull through in the fourth st from end on Rnd 24…
Rnd 25: sc 1 in fourth from the end and next two, turn. (3)
Rnd 26: Don’t ch,  skip first st, sc 1 in next 2, turn. (2)
Rnd 27: Don’t ch, skip first st, sc 1 in the last st, cut and tie off. (1)
*For lining
Rnd 28: Using the color B left off and uncut from Rnd 15, pull one through the end of Rnd 15 and sc 1 in each Rnd and st around the piece, cut and tie off, sew the remainders into the piece. (≈59)

Thanks again to Brenda from Sweet Simple Stuff! You’ll be seeing a lot more blog swaps soon I hope! 🙂

Fun With Stitches: Shell Stitch

I’ll be honest, I’m guilty of over-using the single crochet. So when my Aunt requested a new blanket for her cat, I decided that now’s the time to stretch my wings and try something new.

This is the first of hopefully many “Fun with stitches” blog posts where I try out a new stitch and try and teach how it’s done.

This is the Shell pattern and it’s really simple actually. All you really need to know is the Treble and Double Crochet stitches.

Close up of the stitch

So here’s how it’s done:

Chain a multiple of 8 (For the blanket I made 104 chs)
Rnd 1: Skip 3 chs, tr 5 in next ch, skip 3, dc 1 in next, skip 3, tr 5… Repeat this pattern to the end, turn. (You should end on a dc)
Rnd 2: Ch 3, tr 3 in the dc of last Rnd, skip 3, dc 1 in the next st (third tr), skip 3, tr 5 in the next st (dc of last Rnd), skip 3, dc 1 in next st (third tr)… continue this pattern to end, turn.
Rnd 3 – end: Repeat Rnd 2 until end!

For my blanket I just changed colors between each Rnd. I used Lion Brand Hometown USA Yarn and a size N-13/9.00mm crochet hook.

Calorie free cupcakes?!

You heard right! Well, they’re not really for eating though (unless you’re a goat).

If you didn’t know, Brenda from Sweet Simple Stuff and I did a blog swap last week. Her blog consists of candy, baked goods, and lots of cute idea’s for sweets, so, for our swap, she posted some not so fat free granny squares, you can check them out here, and I posted a free pattern for my Crocheted Cupcake Coasters (that’s an alliteration for all you grammar geeks out there 😉

You can buy these coasters on my Etsy here.

Along with this free pattern I came out with a cupcake themed beanie, and the pattern for that as well!

You can get the Cupcake Beanie pattern for $4 on Ravelry or Etsy, or by simply clicking –>HERE<–


Holy free pattern, Batman!!

This Friday yet another awesome superhero movie of this summer comes out, The Dark Knight Rises, and you know I’m here to make an equally awesome pattern to commemorate it!

So some of you may know the little bat pattern I posted last year, well I used that pattern with a few differences to make today’s free pattern of a simple Batman Logo, but that’s not all…

Iron man’s not the only one with some sweet gloves, and do to the popularity of my Iron Man Fingerless Mittens posted last month, I decided to make some Batman Ninja versions of them!

You can get the Gauntlet pattern for $3 on Ravelry, Craftsy, or Etsy, or by simply clicking –>HERE<–

Pattern available after the jump…

————————————————————————————————————————-

Materials:
Lion Brand Cotton/Lily Sugar’n Cream
/Lion Brand Cotton-Ease
(basically any 100% cotton works)
Crochet Hook-Size G6 4.00mm
Needle to sew in ends with

Abbreviations:

-sc = Single Crochet
-hdc = Half-double Crochet
-dc = Double Crochet
-m.p = Mini Picot (ch 2, sl.st in first ch)
-Ch = Chain

-Rnd = Round

Ch 16
Rnd 1: Skip first 2 chs, Hdc 1, m.p, hdc 1 in next two, sc 1, m.p, sc 1 in next three, m.p, sc 1 in next three, m.p, sc 1, hdc 1 in next two, m.p, hdc 1, sl.st 1 in same as last. Turn upside down and ch 2 (15)
Rnd 2: *On backside. (In where you put the last hdc and sl.st) Dc 1, hdc 1 in next two, sc 1 in next three, m.p, sc 1 in next two, m.p, sc 1 in next three, hdc 1 in next two, dc 1 (14)

Cut and sew the end into the bat to hide it.

I sewed the logo onto an oval and then onto a Beanie. You can get the pattern for the beanie here and buy the Batman beanie here.

And don’t forget to check out the Batman Ninja Fingerless Mittens out on Ravelry here!

Buy the Batman Ninja Gauntlets –>HERE<–

Feu d’artifice au Crochet!


Bonjour! Comme j’ai promis la semaine dernière, pour célébrer le jour Bastille pour nos amis en France, voici un modèle pour un fusée de crochet! Et oui, je sais que mon français est mauvais hahaha.


Kay, back to English, my french isn’t very great. So today I’m going to be posting a new pattern for a Crocheted Rocket / Firework to celebrate both our independence day in America (I know it’s a bit late haha) as well as Frances independence day! Wooo!!


To go along with this pattern, check out last weeks free Party Popper pattern here! 

If you like these two patterns and want to help me out and donate for more free patterns in the future 😉 then feel free to buy both of these patterns on my Etsy HERE! They’ll be sent to you in a shiny PDF pattern in a matter of just a few hours! AND (yes there is an and) you’ll get a coupon for 25% off your next Louie’s Loops pattern!


Check out the pattern after the jump!

——————————————————————————————————————

Materials:
Lion Brand Cotton/Lily Sugar’n Cream
/Lion Brand Cotton-Ease
(basically any 100% cotton works)
Crochet Hook-Size G6 4.00mm
Needle to sew in ends with

Abbreviations:

-sc = Single Crochet
-dec = Decrease
-Ch = Chain

-Rnd = Round

In red Ch 2
Rnd 1: sc 5 in 2nd ch from hook (5)
Rnd 2: sc 1 in each (5)
Rnd 3: sc 2 in each (10)
Rnd 4: sc 1 in each (10)
Rnd 5: sc 1 in first, 2 in next, repeat 5 times (15)
Rnd 6: sc 1 in each (15)
Rnd 7: sc 1 in first two, 2 in next, repeat 5 times (20)
Rnd 8: sc 1 in each (20)
Rnd 9: sc 1 in first three, 2 in next, repeat 5 times (25)
Rnd 10: sc 1 in each (25)
Rnd 11: sc 1 in first four, 2 in next, repeat 5 times (30)
Rnd 12: sc 1 in each (30)
Rnd 13: in back stitches only, sc 1 in first four, dec in next, repeat 5 times (25)
Change to white
Rnd 14: in front stitches only, sc 1 in each (25)
Rnd 15 – 17: sc 1 in each (25)
*For American Rocket* Change to blue
Rnd 18 – 21: repeat (25)
*For American Rocket* Change to white
Rnd 22 – 25: repeat (25)
Change to blue
Rnd 26 – 29: repeat (25)
*For American Rocket* Change to white
Rnd 30 – 33: repeat (25)
*Stuff most of the rocket here and the rest after Rnd 34*
Rnd 31: in back stitches only, sc 1 in first three, [if you’re adding a stick, ch 2 and skip one stitch as your first dec, continue as normal] dec in next, repeat 5 times (20)
Rnd 32: sc 1 in first two, dec in next, repeat 5 times (15)
Rnd 33: sc 1 in first, dec in next, repeat 5 times (10)
Rnd 34: dec in each (5)
Rnd 35: pull one through each st, and last through all, cut off
and sew into center.
* For fire, sew multiple strands off yarn (7 – 10) into the bottom of the rocket, then tie them in a knot. Cut evenly
* For a yarn stick tie a string around a stick and wrap the yarn around the stick sewing into the wrapped section at the end.

Don’t forget, you can definitely donate by buying this and the pattern for the rocket in an awesomely made PDF format –> HERE on my Etsy store <– AND get a coupon for 25% off your next pattern!