Category Archives: Pattern

Party Poppers

Happy July 4th everyone (mostly those in America I guess haha). I had planned on putting out two new free patterns for today, but seeing as Bastille Day is right around the corner I felt I should save one for mon amis en France as well!

But have no fear, if you truly want both patterns now, or you just want to help me out and donate for more free patterns in the future 😉 then feel free to buy both of these patterns on my Etsy HERE! They’ll be sent to you in a shiny PDF pattern in a matter of just a few hours! AND (yes there is an and) you’ll get a coupon for 25% off your next Louie’s Loops pattern!

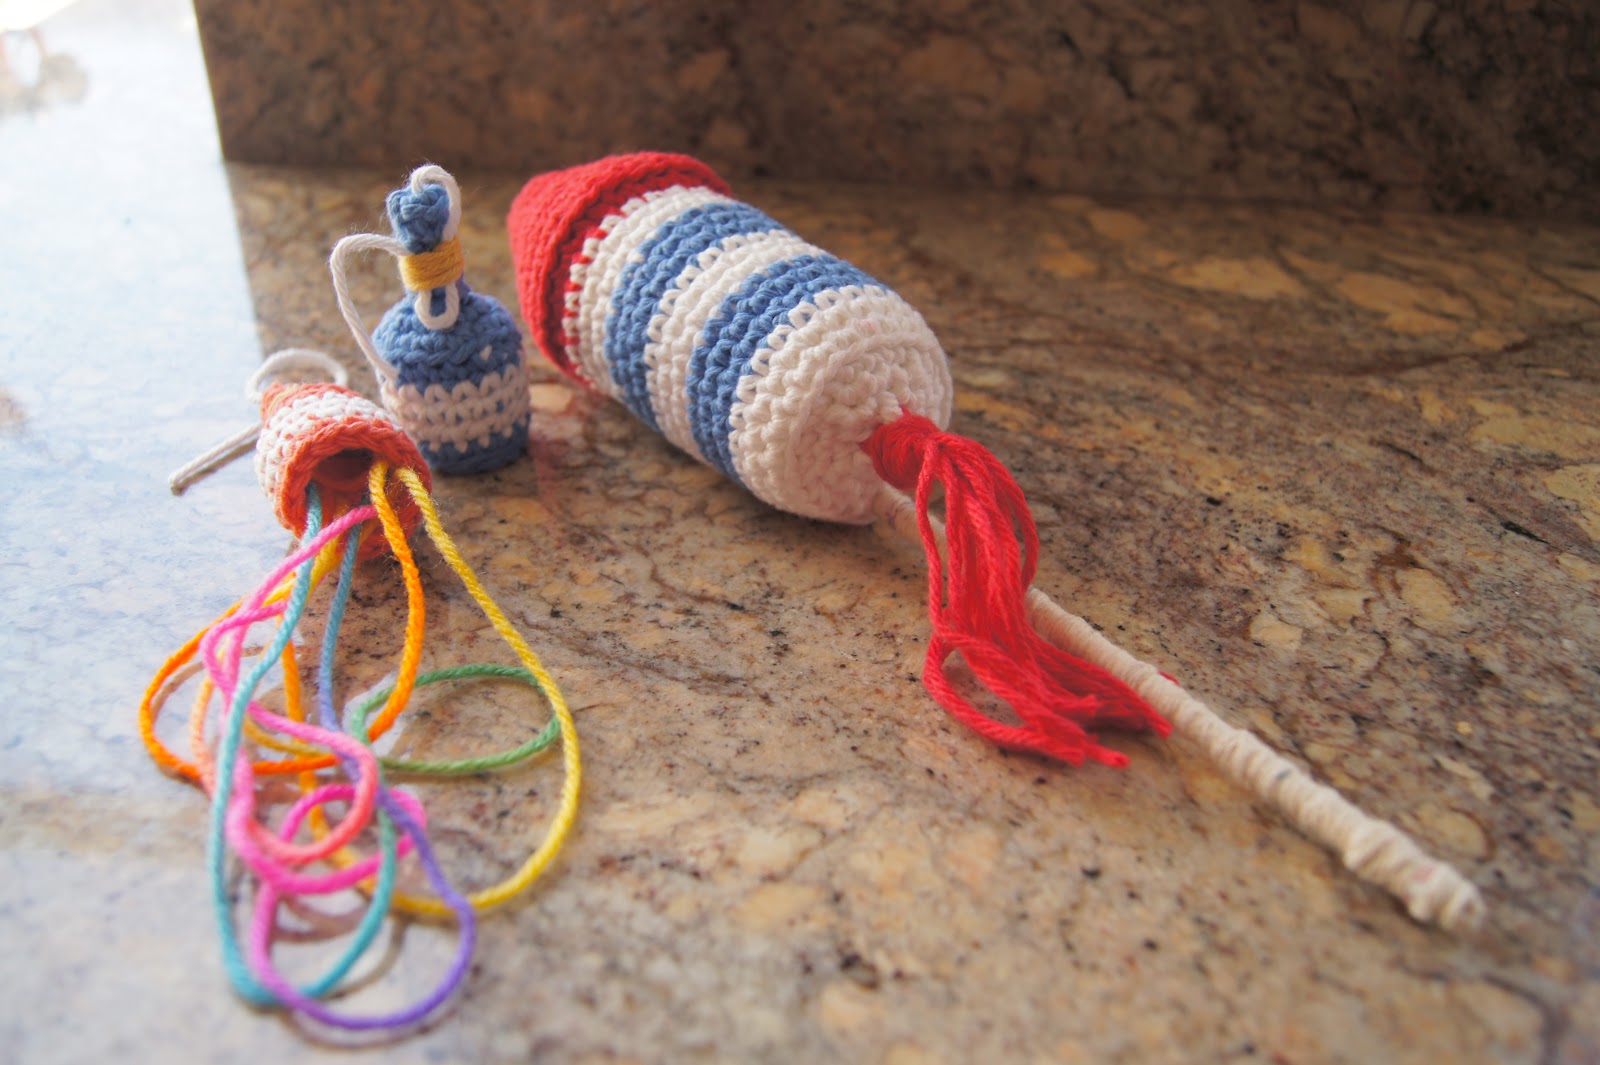
Again though, the rocket pattern will be here on the 14th so if you want to wait, and don’t want to donate 🙁 (haha) then feel free to wait! If not here’s where you can get it now.

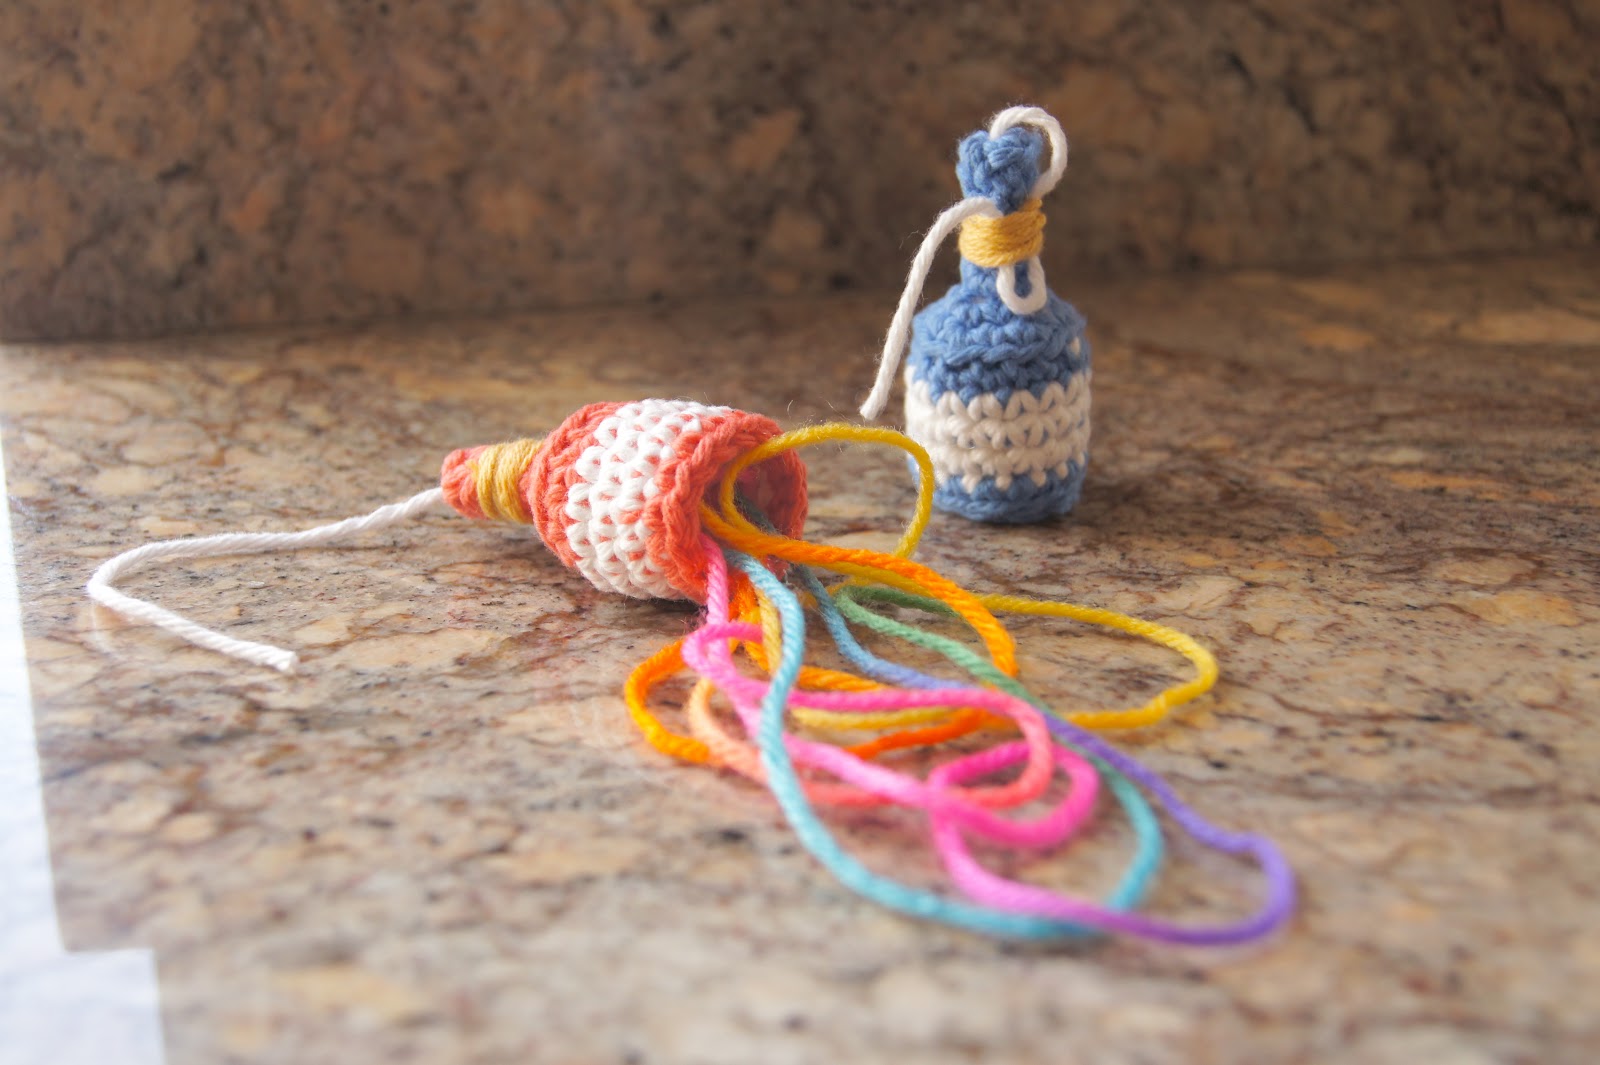
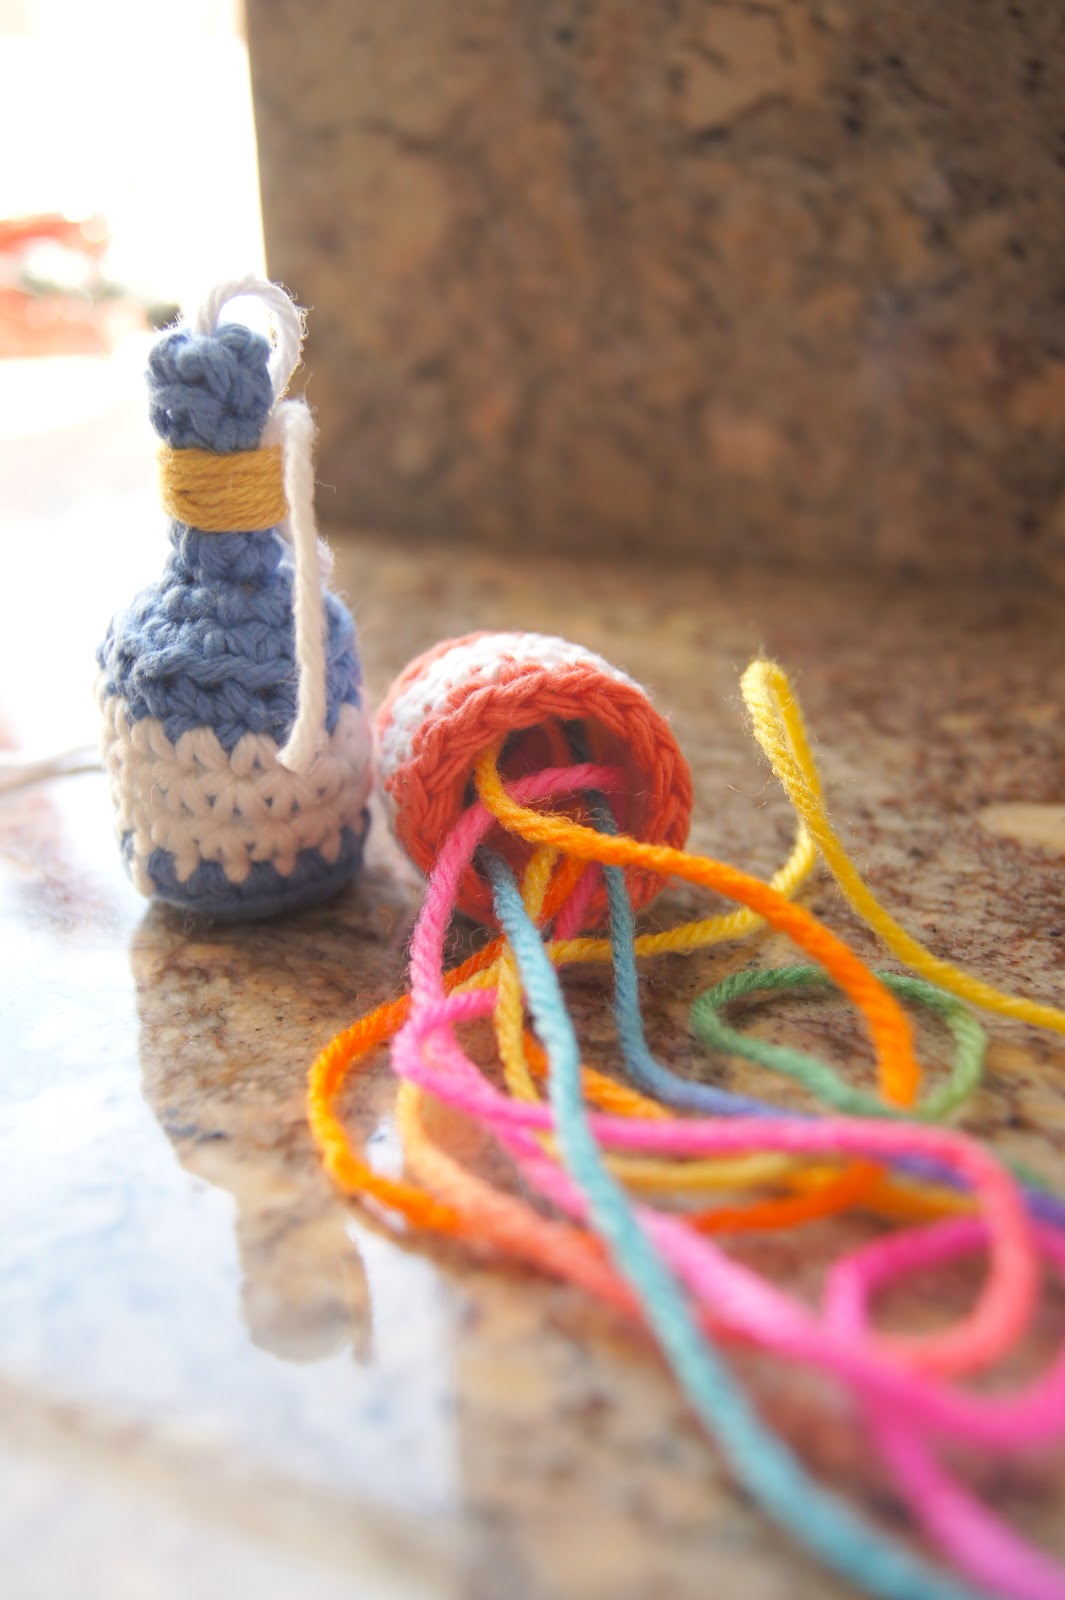
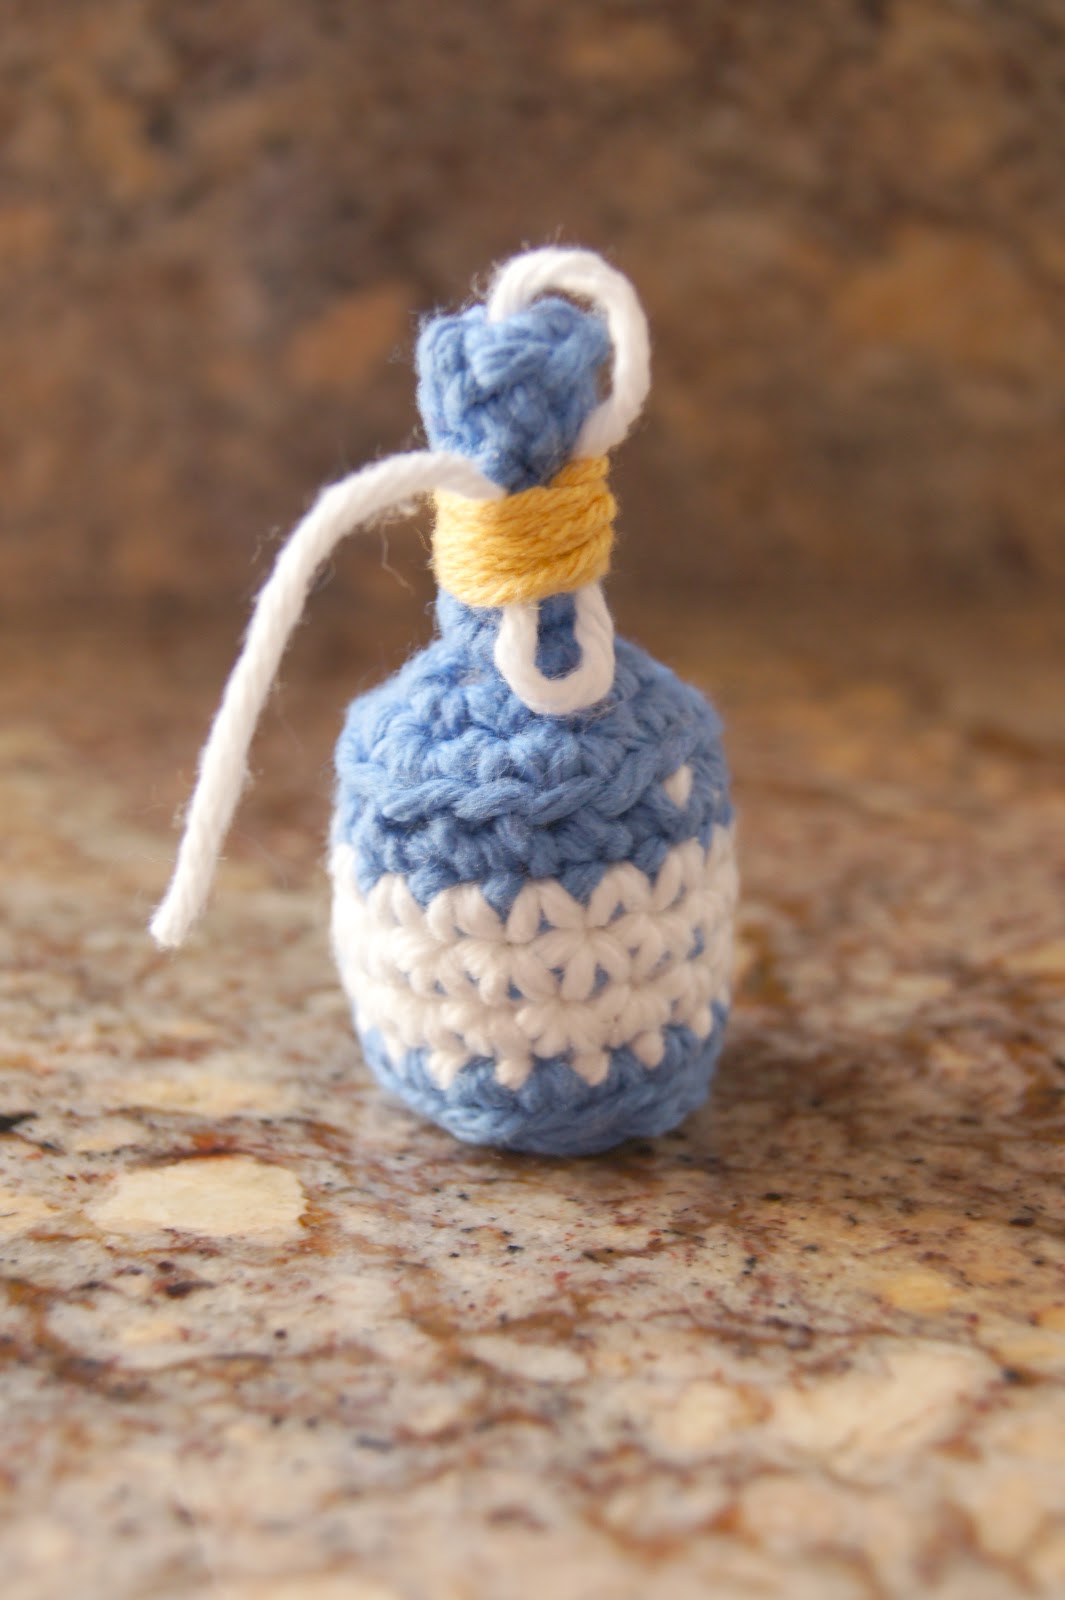
So here’s the pattern for today, party poppers! Great for birthdays, new years, or the 4th of July!!

Pattern available after the jump!!


——————————————————————————————————————
 

Materials:
Lion Brand Cotton/Lily Sugar’n Cream
/Lion Brand Cotton-Ease
(basically any 100% cotton works)
Crochet Hook-Size G6 4.00mm
Needle to sew in ends with

Abbreviations:

-sc = Single Crochet
-dec = Decrease
-Ch = Chain

-Rnd = Round

In color Ch 2
Rnd 1: sc 5 in 2nd ch from hook (5)
Rnd 2: in back stitches only, sc 1 in each (5)
Rnd 3: sc 1 in each (5)
Rnd 4: repeat
Rnd 5: in front stitches only, sc 2 in each (10)
Rnd 6: sc 1 in first, 2 in next, repeat 5 times (15)
Rnd 7: in back stitches only, sc 1 in each (15)
Pull a long end of the white yarn in from the top through the hole in the beginning, Change to white
Rnd 8 – 10: sc 1 in each (15)
Change to color
Rnd 11: sc 1 in each (15)

To make a top
In white Ch 2
Rnd 12: sc 5 in 2nd ch from hook (5)
Rnd 13: sc 2 in each (10)
Stuff the popper and sew onto top.

Take yellow or gold yarn and tie around the handle section of Rnd 2 – 4 and wrap around the white string to make the gold band.

Don’t forget, you can definitely donate by buying this and the pattern for the rocket (coming free on July 14th) in an awesomely made PDF format –> HERE on my Etsy store <– AND get a coupon for 25% off your next pattern!


Crocheted Infinity Scarf

In three weeks my girlfriend and I will be moving up to San Francisco, where I hear it gets a bit cold. I had some extra yarn and decided I’d make her a warm gift. It’s super easy to make so I decided to share with you guys the pattern of how to make a nice simple button infinity scarf.

 
By the way, this is my cousin, whom you may recognize
 ——————————————————————————————————————

Materials:
Lion Brand Wool-Ease Yarn
Crochet Hook-Size N13 10.00mm
Needle to sew in ends with

Abbreviations:

-DC = Double Crochet
-Ch = Chain

-Rnd = Round

Ch 102 (or to desired length)
Rnd 1: Skip first two ch’s, dc 100, turn (100)
Rnd 2: ch 2, skip ch’s, in back stitches only dc 100, turn (100)
Rnd 3: Repeat
Rnd 4: Repeat
Rnd 5: Repeat
Cut and tie off, sew in ends. Sew on two (or more) 1 1/4″ buttons to one side of the scarf. The buttons should fit perfectly between the dc bars while still holding in securely.

That’s it!! See how easy that is? Took me about an hour to finish and about one whole ball of the yarn.

Check back soon because I may begin selling these depending on how much people like it! Let me know!!

It’s not too late by the way! Comment on this post, or crochet one of these and take a photo to receive extra entries in the Awesome June Giveaway! For other ways to enter click here!!

Aviator Earflap Hat Pattern!!

So I’ve got something a little bit different for you guys today. I came out with a new pattern for purchase in the Etsy, Ravelry and Craftsy stores: the Aviator Earflap Hat. You can get the pattern HERE for just 3.50$.

 But that’s not all! I also am giving away the free instructions on how to add your own tassels to any hats you want! The instructions are also available in the purchased pattern as well as a lot more.

——————————————————————————————————————————

So here’s the Aviator Earflap Hat pattern for purchase.

Purchase the pattern HERE <—

Don’t forget to add this pattern to your favorites on Ravelry and Craftsy, pin-it and share it on Facebook too!!

And here is the FREE instructions on how to make your very own tassles and add them to whatever hats you want!

—> Download the free tassel tie instructions HERE

Lastly, don’t forget to enter to win $50 to my Etsy this month by comenting on this post and purchasing the pattern above! For more ways to enter click HERE!!

Flower Power

So it’s summer, and here’s an awesome new free pattern for you guys! You may have seen these flowers on some of the girl hats I make in my shop. Check the hat’s out HERE.

The great thing about these flowers is that they fit perfectly to a 7/8″ (20mm) button, so all you have to do is sew a button on something and you can change the flowers whenever you want!

Also, don’t forget, there is a giveaway going on right now! You could win $50 to my Etsy shop!! If you finish one of these flowers and send me a photo you can get extra entries in!! Also you get an entry for simply commenting on this post! To see a complete list of rules and how to enter, click HERE.

So here are a few photos of the finished product:


 ——————————————————————————————————————

Materials:
Lion Brand Cotton/Lily Sugar’n Cream
/Lion Brand Cotton-Ease
(basically any 100% cotton works)
Crochet Hook-Size G6 4.00mm
Needle to sew in ends with

Abbreviations:

-SL.ST = Slip Stitch
-SC = Single Crochet
-HDC = Half Double Crochet
-DC = Double Crochet
-Ch = Chain

-Rnd = Round

Ch 9, pull loop through first ch made.
Rnd 1: sc 18 around the loop of ch’s *not in ch’s*, sl.st in first sc made, don’t turn (18) [image 1]
Rnd 2: ch 12, skip 2 sts, sl.st in 3rd, repeat this 6 times. [image 2]
Rnd 3: Around each of the ch loops made in Rnd 2: sc 2, hdc 2, dc 4, hdc 2, sc 2, then sl.st where you made the sl.sts in Rnd 2 (12 in each loop, 72 total) [images 3 and 4]

To finish, cut and pull through the remaining yarn and sew it into the body of the flower to hide it. Done! Now just get a 7/8” (20mm) button and you can put it anywhere!

1
2
4

3

 Click the images to enlarge.


Avengers Assemble!!

So last weekend The Avengers hit theaters and it was awesome!! I’m used to be really big into comics when I was younger, my favorite of which were the Fantastic Four. I thought Mr. Fantastic was just the coolest super hero and his brains mixed with his abilities made him the most awesome of superheros. But alas, the movies sucked haha.

Anyhow, I saw The Avengers last weekend and it was just so good. Later, while browsing through Etsy I stumbled upon a shop called Nerdifacts. They make the coolest fingerless gloves to mimic super hero gauntlets. I thought they were pretty cool, so I made my own version of one of her pairs, Iron Mans. Not only did I make a pair for my cousin, but I decided to share the pattern for all of you guys! This way you can make yourself a pair to prepare for your next viewing of The Avengers! Download at bottom of the page or here.

Here are some photos of the final product…

This was my best “kick bad guy ass” pose, haha.

Again, the credit for the idea of these Iron Man Gauntlets goes to Nerdifacts, check out their shop here. You can see a bunch of different ideas for different versions of the fingerless gloves there too.

——————————————————————————————————————————

So here’s the pattern for download, and don’t forget, this pattern may be for Iron Man Gloves, but it includes instructions for making my version of Fingerless Mittens as-well.

Download the pattern HERE <—

Don’t forget to add this pattern to your favorites on Ravelry and Craftsy, pin-it and share it on Facebook too!!

Crochet the Fashionable Way

Finally, a new FREE pattern for you guys, and I made it into a cool, fancy PDF too!

So I was bored one day and wanted to make a bow tie, I looked all over for patterns on making one, but all I could find were patterns for pre-tied bow ties, and where’s the fun in that! So I made my own :). I thought, well since there aren’t any I could find, I might as well post one. You can buy one of these bow ties too, right here.

Here are some photos, scroll down to view and download the pattern.


Crocheted Bow Tie Pattern

——————————————————————————————————————————

*EDIT* 8/31/12

So here’s the free pattern for download via Ravelry.

Download the pattern HERE <—

Don’t forget to add this pattern to your favorites on Ravelry and Craftsy, pin-it and share it on Facebook too!!

Don’t forget, you can buy one of these bow ties too! HERE

Here’s the dealio, I want to be able to give all my patterns for free, and I would if I could, but I can’t. I can’t because it takes lots of time to make them and make sure it looks pretty, and I’m a student and don’t make a lot of money as it is, so here’s my idea, if you like this pattern please hit the button to the top right to donate a little something; you don’t have to (obviously) but it would mean a lot to me and show me that people do want more patterns.

Movember (No Shave November)

Have you guys heard of this thing called Movember? It’s basically a fundraising campain where you grow a mustache to “raise funds and awareness for men’s health, specifically prostate cancer” (us.movember.com). I think it’s awesome, but what about those who either, can’t grow a mustache, or aren’t comfortable with their facial hair growing abilities (like myself)? Well have I got a solution for you!

Many of you have seen my previous pattern for a mustache that I put up a while back, well now get ready for the new mustache of the season….

HorseShoe Mustache!

Bam!

Many famous people have sported these bad boys throughout the years, like Hulk Hogan, John Lenon, and Seth Rogen, and now, you too!!

Along with this bad boy comes these sweet sideburns that can be attached to glasses, you may have seen them on the Early November Giveaway I did a while back.

I know it may be a little late, but better then never, here’s the pattern for the Horseshoe Mustache and Sideburns!
——————————————————————————————————————


Materials:
Lion Brand Cotton/Lily Sugar’n Cream
/Lion Brand Cotton-Ease
(basically any 100% cotton works)
Crochet Hook-Size G6 4.00mm
Needle to sew in ends with

Abbreviations:

-SL.ST = Slip Stitch
-SC = Single Crochet
-HDC = Half Double Crochet
-DC = Double Crochet
-Ch = Chain

-Rnd = Round

Mustache
Ch 31
Rnd 1: skip 1st ch, sl.st 1, sc 8, sc 2 in next ch, hdc 2, dc 1, sc 1, ch 1 around next ch (see the bottom of the page here for photos), sc 1, hdc 1, dc 1, hdc 2, sc 2 in next ch, sc 8, sl.st 1.
Fasten off and sew ends in the mustache.

Sideburns
Make two
Ch 10
Rnd 1: skip 2, hdc one in each (8)
Rnd 2: ch 2, hdc one in each (8)
Rnd 3: ch 1, skip first hdc, hdc one in each (7)
Rnd 4: ch 2, hdc one in each (7)
Rnd 5: ch 1, skip first hdc, hdc one in each (6)
Rnd 6: ch 2, hdc one in each (6)
Rnd 7: ch 2, hdc one in each (6)
Rnd 8: ch 3, skip first hdc, dc 1, ch 1 and skip next hdc, dc 1, ch 1 and skip next hdc, dc 1, tie off and sew in.

To attach it to glasses, weave in the temples (things that hold on to your ears) in and out of the dc’s from the last row.

Put a little bit of tape onto the insides of the mustache to keep it on your face!

Make sure you check out the Movember website here, and donate!

You can buy these mustaches here.


Halloween Costume

So Halloween was Monday and I was a Dungeon Master (my girlfriends idea). It’s a variation of the Christmas Hat, but with stars, and button on ears. Oh, and a cool beard that connects to my glasses! All of which are coming soon in either pattern or buy able form, or both!

I’m selling these wizard hats here, but not the beards just yet (still needs to be perfected)!

So here’s a few more photos and a pattern for the little stars on the hat, because, why not?

—————————————————————————————————–
Some photos:


—————————————————————————————————–

Here’s a photo of the final product:
Materials:
-Lion Brand Cotton/Lily Sugar’n Cream Yarn/Lion Brand Cotton-Ease Yarns (basically any 100% cotton works)
-Size US-G/4.00 mm Crochet Hook

Abbreviations:

-SL.ST = Slip Stitch
-SC = Single Crochet
-HDC = Half Double Crochet
-Ch = Chain

Pattern:
Ch 2 DON’T TURN
Rnd 1: sc 5 in 2nd ch from the hook (5) Don’t turn.
Rnd 2: sl.st in first sc, [ch 4, sl.st. in 2nd ch from hook, sc in next, hdc in next, sl.st in next sc] repeat 5 times. (to end)
cut and pull yarn through, sew in end.

Really easy and quick pattern.

By the way. I know I’m basically giving away one of the answers in the November Giveaway, but there’s also somewhat of a hint for another answer!

Lastly, these ears and hats are available for sale here, and I’ve got some great ideas for these ears so keep in touch by Facebook or email!

Taking Crocheting to the Future

So I’m somewhat, okay a lot of, a nerd. For those of you who arn’t or maybe didn’t know, there’s a little convention called Comic Con, and last Thursday through Sunday all the lucky people of New York had their 6th annual Comic Con. Unluckily for me I live in California, and I’m also broke 🙂 but to commemorate this event and kinda commemorate Halloween, which is just around the corner, I decided to make a nerd based crocheted item (the first of many more). For those of you who don’t know, this is known as a Brain Slug from the show Futurama. It attaches to someone’s (or something’s) head and controls them, kinda making them into a zombie like state. Any how, you can see a video of the episode with these guys here.

—————————————————————————————————————–

Here are some photo’s of the finished product:


Materials:
Lion Brand Cotton Ease Lime Green
-Size US-G/4.00 mm Crochet Hook
-White Felt
-Small (about 1/4-1/2″) Black Button
-A little bit of stuffing

*First make a tiny ball of yarn separate from the main ball for the antennae.

Pattern:
Ch 2 (DON’T TURN)
Rnd 1: sc 6 in 2nd ch from the hook
Rnd 2: sc 2 in each st (12)
Rnd 3: sc in next st, inc in next st, Repeat 6 times (18)
Rnd 4: sc in next 2 st, inc in next st, Repeat 6 times (24)
Rnd 5: sc in next 3 st, inc in next st, Repeat 6 times (30)
Rnd 6: sc in each st (30)
Rnd 7: sc in next 4 st, inc in next st, Repeat 6 times (36)
Rnd 8-17: sc in each st (36)
Rnd 18: (on outer stitches only) [stitches separated by commas] dc 1 tc 1 dc 1, sl.st, dc 1 tc 1 dc 1, sl.st, sl.st, sl.st, dc1 tc 2, tc 2 dc 1, sl.st, sl.st, dc 1 tc1 dc 1, sl.st, sl.st, dc 1 tc 1, tc 1 dc 1, sl.st, sl.st, dc 3, sl.st, dc 1 tc 1 dc 1, sl.st, sl.st, sl.st, dc 1 tc 2, tc 2 dc 1, sl.st, sl.st, dc 1 tc 1, tc 1 dc 1, sl.st, sl.st, dc 3, sl.st, dc 1 tc1, tc 1 dc 1, sl.st.
Wait…
Now you should find two spots on the head, where the antennae will go, make them equal distance. Choose a spot on the head and insert hook, tie a slip knot and pull it through, then insert hook in next spot directly below the first and loop over and pull through creating a ch. Now stick the hook back in the second spot and pull the rest of the yarn through the spot but not through the first ch. Then ch 10 more. Sl.st in second ch from hook and then in each ch to the bottom, tie off and pull the rest of the yarn into the middle of the body to hide the yarn. Do this twice for each antennae and curl the end a bit.

Now cut a circle out of the felt, and sew the button on before sewing the entire eye onto the body.

Now back to the body..
Rnd 19: (on inner stitches of Rnd 17) sc in next st, dec in next st (24)
*STUFF*
Rnd 20: dec all around (12)
Rnd 21: dec all around (6)
Rnd 22: keep dec around untill closed up.

You can sew on a hair clip or onto a headband to keep it in your hair, but other then that, your brain slug is done and can happily suck out all the grey brain matter it can get it’s slime on!

I make a great zombie slave

You can buy this guy here!