Category Archives: Halloween

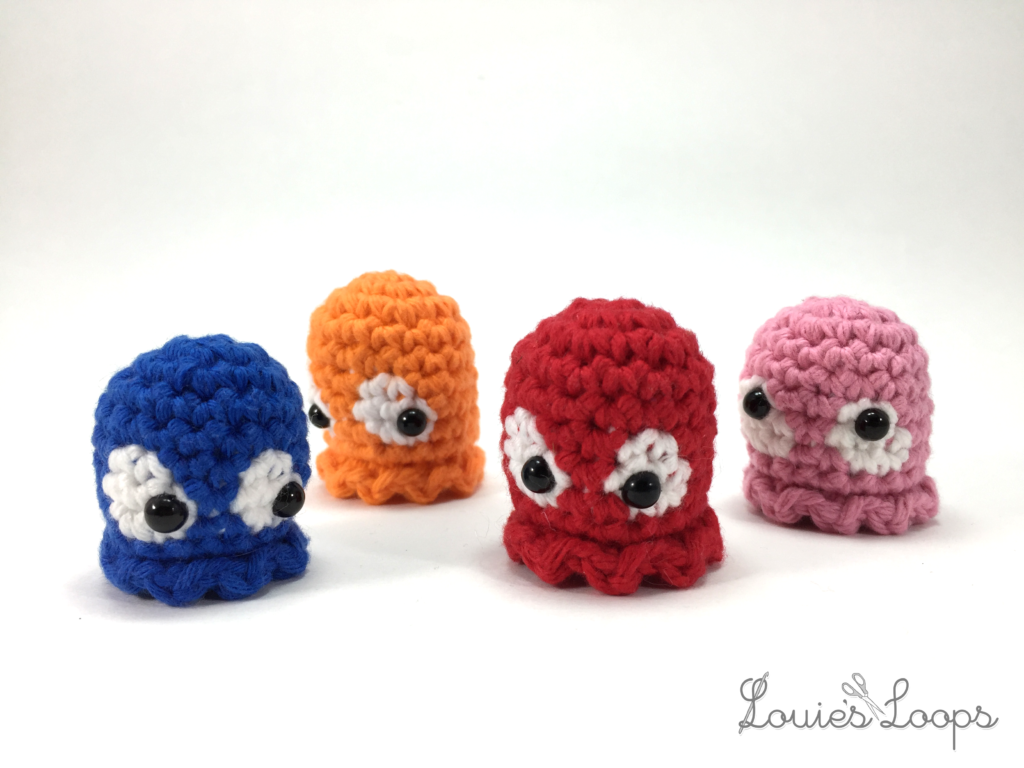
How to Crochet: a Pac-Man Ghost

main-image_withlogo
I was getting ready for Halloween and started making a ghost, when I thought… “Wait.. why don’t I just turn this into a Pac-Man Ghost!” So I did!

This pattern is my very first Pocket Pattern! What’s a pocket pattern? I’m glad you asked Louie!


Pocket Patterns are free printer friendly PDF’s that can be easily folded up into a small booklet and taken on the go!

I explain it all in the video after the jump…

Continue reading

How to crochet: A Skull

Pattern 2 for Halloween! I’m a huge fan of this time of year, so to celebrate I’ve got a few new patterns for you guys! I’ve never yet seen a really good pattern for a crocheted skull online, so I figured I’d make one for you guys!

Materials needed:
– Worsted Weight Yarn
– Size US-G/4.00mm
– Needle to sew in ends
Stitches used:
– Sl.st (slip stitch)
– Ch (Chain Stitch)
– Sc (Single crochet)
Difficulty: ● ● ● ● ○
*Includes video tutorials!*

Rnd 1: sc 6 in 2nd ch from hook, don’t turn (6)
Rnd 2: sc 3 in first st, 2 in next st (aka inc), 1 in next st, repeat once (12)
Rnd 3: sc in first st, inc in next 3 sts, sc in next 3 sts, inc in next 3 sts, sc in last two sts (18)
Rnd 4: sc in each st around (18)
Rnd 5: sc in next 10 sts, *split
*Split (See video here for detailed instructions: http://youtu.be/3zAu8LMsQac)*
Pull one loop through in black and one in white
Using white: working in front loops only, sc in next 2 sts leave loop here and go back to color black.
Using color black: working in back loops only, sc in the back loops of the next 2 sts. Cut a long end and pull through, go back to white.
Back to white: sc in both loops of the next 3 sts (around the thread of black to hide it)
Repeat this process one more time, pull one loop through in black and one in white
Using white: working in front loops only, sc in next 2 sts leave loop here and go back to color black.
Using color black: working in back loops only, sc in the back loops of the next 2 sts. Go back to white.
sc in both loops of the next next st. (18 [+4])
Rnd 6: sc in next 9 sts, sc in the back loop of the next st, change to black, working into black sts sc in next 2 sts, change back to white, sc in next 3 sts, change back to black, working into black sts sc in next 2 sts, sc in back loop of the next st. (18)
Rnd 7: sc in next 10 sts, change to white/black, sc in next 2 sts, change to white, sc one, change to black, sc in back loop of next st, change to white, sc in next st, change to white/black, sc in next 2 sts, change to white sc in next. (18)
Rnd 8: sc in first st, dec in next st, repeat twice more, sc in next st, sc in the back loop of the next st, sc in next 2 sts, change to white/black, sc in next 2 sts, change to white, sc in next st, sc in the back loop of the next 2 sts. (15)
Rnd 9: dec in the next 2 sts, carry a second strand of yarn with, dec in next, sc in next, *split*
*Split
Pull one loop through in white1 (yarn A) and one in white2 (yarn B)
Using yarn A: working in front loops only, sc in next 8 sts leave loop here and go back to yarn B.
Using yarn B: working in back loops only, dec 4 times in the back loops of the next 8 sts.
dec in next 2 sts. cut, stuff, and sew closed.


Now go check out last weeks free pattern for how to make a witches hat! I use this pattern for the witch, Gandalf, and even for Link!

How to crochet: A Witch / Wizard Hat

It’s Halloween time again! I’m a huge fan of this time of year, so to celebrate I’ve got a few new patterns for you guys! First off, let me plug my patterns that I have for sale new as of today! Check out these two new patterns, Gandalf and a Witch!

So lets get to the free pattern of today, how to make a witches hat! I use this pattern for the witch, Gandalf, and even for Link!

– Pattern –
Materials needed:
– Worsted Weight Yarn
– Size US-G/4.00mm
– Needle to sew in ends
Stitches used:
– Ss : Slip-stitch
– Sc : Single Crochet
– Hdc : Half -double Crochet
– Dec/Inc : Decrease/Increase
– FLO/BLO :Front/Back loops only

All in black
Ch 2 or use adjustable ring (Don’t Turn)

Rnd 1: Work 4 sc in 2nd ch from hook or into magic hoop (4)

Rnd 2: Working in BLO, sc in each st (4)

Rnd 3: [sc, inc] repeat once (6)hat2

Rnd 4: sc in each st (6)

Rnd 5: inc 2, sc 4 (8)

Rnd 6: sc, inc 2, sc 5 (10)

Rnd 7: sc 2, inc 2, sc 6 (12)

Rnd 8: [sc 3, inc] repeat 3 times (15)

Rnd 9: [sc 4, inc] repeat 3 times (18)

Rnd 10: [sc 5, inc] repeat 3 times (21)

Rnd 11: sc 15, inc, sc 2, inc, sc 2, inc, sc 3 (24)

Rnd 12: Working in FLO, sc in first, hdc in each st around (24)

Sc one in both loops of the first sc made in this Rnd, ss in next st, cut long to sew onto head and pull through.

Using purple, sew a strand around the outside, then use yellow to sew on a buckle in the middle.

il_fullxfull.844715743_ar4s


Happy Halloween! You can get the full pattern for the Witch and all her Halloween monster friends in my new Pattern Bundle available here:

How to Crochet: Heisenberg

So it’s been a while… I’d like to say a few things, but there’s no time, pattern time!!!

Halloweens coming up again, and theres nobody I can think of scarier than Heisenberg himself. Those who don’t know who Walter White is should start watching Breaking Bad… now. No seriously, stop reading this and watch all 5 seasons of Breaking Bad in one sitting and then come back here. Shouldn’t take too long.

So while those guys are gone, check out this pattern I made for a recent Breaking Bad themed Reddit gift exchange!

And check back soon for a long awaited video tutorial for the Bat Pin pattern I posted a while back! Yep, video tutorials, coming soon to a Louie’s Loops near you!!

Finally, you can buy this little dude in my shop HERE


Materials:
(basically any 100% cotton works)
Needle to sew in ends with
-Three nickels or small coins
Abbreviations:
-SL.ST = Slip Stitch
-SC = Single Crochet
-dec = decrease
-inc = increase
-Ch = Chain
-Rnd = Round

Body and Head:

Ch 2 or use adjustable ring (Don’t Turn)
Rnd 1: sc 6 in 2nd ch from the hook (6)
Rnd 2: sc 2 in each st (12)
Rnd 3: sc in next st, inc in next st, Repeat 6 times (18)
Rnd 4: sc one in each (18)
Rnd 5: sc in next 2 st, inc in next st, Repeat 6 times (24)
Rnd 6: sc in next 3 st, inc in next st, Repeat 6 times (30)
Rnd 7-12: sc one in each (30)
Rnd 13: sc in next 3 st, dec in next st, Repeat 6 times (24)
Rnd 14: sc one in each (24)
Rnd 15: sc in next 2 st, dec in next st, Repeat 6 times (18)
Stuff here
Rnd 16: sc in next st, dec in next st, Repeat 6 times (12)
Change to white
Rnd 17: sc one in each [3 white, 9 black] (12)
Rnd 18: sc one in each [1 black, 1 white, 10 black] (12)
Rnd 19-21: sc one in each (12)
Stuff here and put in 3 nickels. These will help keep the finish piece upright.
Rnd 22: sc dec one in each. (6)
Draw last 6 stitches up and close tightly.  Weave in end.

Hat:
Ch 2 or use adjustable ring (Don’t Turn)

Rnd 1: sc 6 in 2nd ch from the hook (6)
Rnd 2: sc 2 in each st (12)
Rnd 3: sc in next st, inc in next st, Repeat 6 times (18)
Rnd 4: sc in next 2 st, inc in next st, Repeat 6 times (24)
Rnd 5: sc in next 3 st, inc in next st, Repeat 6 times (30)
Rnd 6: Working in back loops only, sc one in each (30) This will make the ridge for the top of the hat
Rnd 7-9: sc one in each st (30)
Rnd 10: sc one in first 15 sts, two in next, repeat once (32)
Rnd 11: sc one in each st (32)
Rnd 12: Working in front loops only, sc one in first 4 sts, inc in next, one in next 4, inc in next, one in next 10, inc in next, one in next 4, inc in next, and finally one in last 6 sts (36)
Rnd 13: sc one in next 5 sts, inc in next st, Repeat 6 times (42)
Cut and weave in end.
Bag of baby blue:
Ch 5
Rnd 1: skip first ch, sc one in next 3 chs, sc two in next ch, turn work upside-down and sc one in the 3 last chs so that your working back but never turning, sc two in the last ch (but first ch made). Don’t turn. (8)
Rnd 2: Working in back loops only, sc one in each st around (8)
Rnd 3: sc one in each st (8)
Change to white
Rnd 4: Here you’re going to be sc the piece together. In both the first and last sts together sc one, continue down the piece a total of 4 times. (4)
Cut and weave in the end.
For the goatee, I cut out a small amount of felt and sewed it onto the face along with some simple eyes. I’d suggest using buttons for eyes instead of the way I did it, but it’s all preference.
For the glasses I cut out two identical pieces of felt and sewed them together. I tried to make some crocheted glasses instead, but it never really looked right.
And that’s that! Now you can have the scariest and most dangerous drug dealer of all time sitting cutely on your counter!
ANFSCD: A Very Harry Halloween

Warning ahead of time… it gets a bit.. um.. collegey in this post.

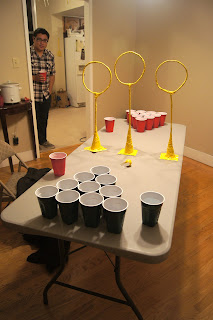
For this Halloween my friends and I decided to go a bigger then just a simple Halloween party. We decided, why not do a Harry Potter Party, and man was it a success. We had apple cider, butter beer, trivia, movies, expelliarmis shots, and of course… Quidditch Pong.

What’s Quidditch Pong Louis? Good question, Louis. Quidditch Pong is a personal invention that mixes the timely art of beer pong, and the amazing wizard sport Quidditch.

First you have to make the hoops. I made mine with hangers and yellow duct tape. Make sure you make them various sizes!

Then you have to make some butter beer. Here was my recipe:
           7 parts Rootbeer or Cream Soda
           1 part butterscotch schnaaps
           1 part vanilla vodka (for an extra kick!)

You can find some other recipes for butter beer, including non alcoholic, here: http://www.yumsugar.com/Hot-Cold-Butterbeer-Recipe-380247

The rules for Quidditch Pong are much like beer pong with a few changes:

  1. Choose what team goes first with your sorting hat!


  2. If the quaffle (ping pong ball) goes through a hoop and makes it in the cup it counts as two (much like if the ball were to bounce)
     
  3. If the quaffle goes through a hoop the enemy team is allowed to use there bludgers (hands) to knock it out of the way.
  4. When there is one cup left, the snitch must be used. Trust me, this makes things a lot more difficult. I made my snitch by just wrapping a ball in yellow duct tape and attaching a few wings made out of paper, but you could easily use a yellow ping pong ball with glued on wings.
  5. Enjoy!!
We split the party up into houses to make the game more competitive.
We finished the tri-wizard tornament off with some Expeliarmus Shots! You can find the instructions here: http://www.buzzfeed.com/michaelm70/the-official-harry-potter-shot-4cll

The party went awesomely. We’ll definitely be doing this next year!

Rotary Street Fair 2012!

What are you guys doing Sunday? Do you live near Thousand Oaks, California and not doing much, or even if you are doing something, just ditch it and come hang out with me at the Rotary Street Fair!!

Here I am at the booth last year!

You can get more information about it here: http://www.conejovalleyguide.com/local-events/2012-thousand-oaks-rotary-street-fair-on-sunday-october-21st.html

Seriously guys! Come by and check out my booth! I’ll be selling a bunch of hats and other crocheted fun stuff!! I’d love it if you come out and say hi!

See you guys Sunday!

New Halloween Patterns (With COUPON!) + iPhone Cases!

For Halloween, I made and posted a couple patterns for some Halloween themed hats that I made last year in the Etsy and Ravelry stores!

Check out the Bat and Frankenstein’s Monster Earflap Hat Patterns today!

And if you hurry to buy these before Halloween, and use the code “MONSTER” on any of the patterns for sale in my Etsy store, you’ll 15% off!!

Wait… you thought that was all? Ha! Check out the brand new crocheted iPhone cases in the Etsy store today!! Here’s some photo’s and the spiel on the listing:

Keep your iPhone safe and customized with a hand crocheted iPhone case! Handmade in a silky soft, yet strong and durable cotton / acrylic blend, these iPhone cases come in either iPhone 4 or 5 sizes. They’re made with openings for charging, headphones, and switching on and off vibrate so you never have to take it off! Speaking of which, the cases slip on easily and stay very secure while still keeping both the front and back cameras, mics, and flash open for the perfect photos!

Best part is, you choose the color! These cases come in a rainbow of colors, here’s a list:
White, Light Gray, Dark Gray, Black, Ocean Blue, Tadis Blue, Yellow, Lime Green, Hazelnut, Red, Pink, Azalea, Purple, Sand
Not in photos above, but still available in: Light Blue, Navy Blue, Green, Fern Green, and Brown 

Halloween Costume

So Halloween was Monday and I was a Dungeon Master (my girlfriends idea). It’s a variation of the Christmas Hat, but with stars, and button on ears. Oh, and a cool beard that connects to my glasses! All of which are coming soon in either pattern or buy able form, or both!

I’m selling these wizard hats here, but not the beards just yet (still needs to be perfected)!

So here’s a few more photos and a pattern for the little stars on the hat, because, why not?

—————————————————————————————————–
Some photos:


—————————————————————————————————–

Here’s a photo of the final product:
Materials:
-Lion Brand Cotton/Lily Sugar’n Cream Yarn/Lion Brand Cotton-Ease Yarns (basically any 100% cotton works)
-Size US-G/4.00 mm Crochet Hook

Abbreviations:

-SL.ST = Slip Stitch
-SC = Single Crochet
-HDC = Half Double Crochet
-Ch = Chain

Pattern:
Ch 2 DON’T TURN
Rnd 1: sc 5 in 2nd ch from the hook (5) Don’t turn.
Rnd 2: sl.st in first sc, [ch 4, sl.st. in 2nd ch from hook, sc in next, hdc in next, sl.st in next sc] repeat 5 times. (to end)
cut and pull yarn through, sew in end.

Really easy and quick pattern.

By the way. I know I’m basically giving away one of the answers in the November Giveaway, but there’s also somewhat of a hint for another answer!

Lastly, these ears and hats are available for sale here, and I’ve got some great ideas for these ears so keep in touch by Facebook or email!

Halloween Cupcakes

So today we’re having family and friends over for a Halloween dinner, and for desert my mom made these neat cupcakes with witch hats on them. So I thought this would be a good time to tell you guys about a lady I met named Brenda Vanover! Brenda created the idea for the cupcakes and make really need things with candy and sweets. Seriously, she has the “eye” for all things candy and makes things that are truly impressive, but still simple to make! She runs sweetsimplestuff.com where she shares her creations! I strongly recommend you guys check her out.

So for the hats, Brenda uses York Peppermints, but the ones my mom bought were shaped like pumpkins for Halloween so they didn’t work and she had to improvise and use the cookie parts from Oreo’s. They’re made with a Hershey’s Kiss, some frosting, and a York Peppermint. You can find the instructions at Brenda’s site here.

Here’s one of the great things she uses the hats in.

Keep an eye out for this one!